Saturday, 5 September 2015

Claymore 2015

I know it was a month ago (always the first Saturday in August) but I've finally got around to uploading my pictures from Claymore 2015, which is put on every year by the SESWC in Edinburgh.  For the first time I took my son who is 12, so it was interesting to see his reaction and/or indifference to the games as the case may be.  Anyway, here are some photos.
These are a couple of shots from a Very British Civil War game.  My son was intrigued by the various factions on the table including Mosley's BUF Blackshirts (or whatever they were). 
When their political sympathies were explained he loudly hissed the word "Fascist!" in the style of the landlady doing the crossword in the film "Hot Fuzz" at the point when Sgt Angel turns up at the hotel.

The following are some pictures from a Gallipoli game (I think) with French troops attacking a Turkish position.  I rather liked the scenery and set-up.  I think this was put on by the RAF Leuchars Wargame Club.


However, this was the game that my son was most interested in, a public-participation Halo box set game developed by Spartan Games.  Apparently there is a quite popular electronic version of it on the X-box thingy.  Not my bag really (starter set reduced to only £60!), but he enjoyed it (for an hour or so until we dragged him away), chucking armfuls of dice and giving weaponry tips to the game designer, allegedly.

Finally, some pictures of a Vietnam game.  I was particularly interested in the vegetation as I've a few packages on the way with various artificial plants in them that I needed inspiration for.

Overall then another enjoyable day spent wandering around the tables and wondering how the students at the Edinburgh College can live long enough to graduate if they risk the catering more than once a month.

Saturday, 29 August 2015

One-Hour Wargames 12: An Unfortunate Oversight

The point of this scenario, taken from Neil Thomas' book One-Hour Wargames, is that the defending commander has been tasked with holding the bridge (here's one (or rather two) I made earlier) but is unaware that there is also a ford in the vicinity which may allow him to be outflanked.
Nice bit of planking.
The scenario states that possession of the hill by the end would determine the victor.  This map shows our set-up, with the bridge on the left and the ford on the right.
OHW 12: An Unfortunate Oversight
This game pitched Napoleonic French against a ragbag of Coalition forces, comprising mainly Prussians with some British thrown in for no adequately explained reason. This was the initial setup, with two regiments of French foot trying to cross the bridge, with another two foot regiments plus dragoons and cuirassiers attempting to sneak round and flank the Allies via the ford.
French poised to cross the river at two points
You will notice that the battlefield is actually the reverse side of an old Subutteo pitch with the lines showing though, clearly indicating that this would be a game of two halves.
French infantry plus Mameluke general cross the bridge
As was required by the scenario, the game started with both wings of the French army trying to get across the river as fast as possible.  My scheme was to keep the Allies occupied on the left whilst my cavalry rushed across the ford on the right and grabbed the hill.  At least that was the plan.
French cavalry cross the ford (very old Hinchliffe figures)
However, with surprising alacrity the Allies pushed most of their forces towards the hill leaving a containment force on the French left.  The fight was on.
Prussians block French advance on the left
On the right the French cavalry raced towards the hill but the Prussians got there first.  Meanwhile the French infantry on the right followed up slowly.
View from French right - cavalry nearly at the hill.
Forcing some of the Prussian infantry into square, the cuirassiers were repulsed by close range fire as they crested the hill.  The looming presence of some Prussian dragoons didn't help.
Cuirassiers thankful they have backplates as well
Meanwhile on the French left a prolonged firefight developed with the French proving to have the advantage (eventually).
Prussian infantry running away (for a bit anyway)
However, this was of no help on the right, where the retreating cuirassiers were charged in the rear by the Prussian dragoons and routed.
Prussian dragoons crash into repulsed Cuirassiers
Unhelpfully, the other squadron of Prussian dragoons charged the French dragoons and they too wavered and fled.  The French infantry having just made it across the ford had no option but to form square and await their fate.
Dragoons rout, infantry in square, what else could go wrong?
Meanwhile on the left the Prussians were finding their resolve again, and although chased by a regiment of light infantry, the Prussians reformed, supported by troops from the centre.
For the French left, the tide is about to turn.
With the French right wing either routing or pinned in square the French left was not strong enough to take the hill, or indeed move out of the village, and started to waver and then crumble.  And there it ended after eight moves.
Endgame
Overall, this was quite disappointing performance by the French.  The 'unfortunate oversight' proved to be nothing of the sort as the Allies could quickly move to block the French advance on the right, whilst containing the smaller force on the left.  Perhaps next time I shouldn't split the French forces but then there would be even less to detain the enemy from rushing over to the ford to stop the advance.
It's hip to be square.
It may have worked if the crossing points were further apart or the Allies moved slower, or were inhibited in some way (such as by dice-enforced incompetence) but that was not how it turned out.

In case you were wondering, the figures consisted of Airfix and Esci 20mm plastics (it's not often you see Airfix plastic Highland light infantry on the table), and for historical reasons (and because the plastics aren't finished yet) the French cavalry and generals were represented by some (very) old "25mm" Hinchliffe figures, painted sometime last century.

The rules were WRG 1685-1845, which are still simple and elegant.  I don't know why people complain about the move sequence because we've never had trouble with it.  The only thing I noticed however, was the command and control aspect of it, as I'd forgotten how older rule-sets such as these often allow units to shoot off all over the place, without the requirement to maintain battle lines and higher level cohesion.  Nevertheless, they are still a serviceable set of rules which we will continue to use until we find something better.
Handmade buildings
Finally, the terrain was all scratch built, including the buildings.  You can't tell but the cottage on the right started off as a box that a Hornby goods wagon came in (it's not in there now) and the stones on the chimney were all lovingly hand carved by Geoff from a piece of plywood.

Saturday, 2 May 2015

A Tale of Two Bridges

Pondering the scenario we were going to use for our next game I realised that, regretably, I appeared to be short a bridge (or two).  I'd already made various river sections and an 'ancient' DMB style bridge, but needed something a bit more modern.  It's all relative.
My first thought was that were going to have an ACW game so I clearly needed a wooden bridge for that.  I made it about 45mm wide in order to accommodate our ACW plastics and in fact most of our other standard WRG basing (i.e. DBM/DBA/DBR).
Construction materials comprised matches stuck on to pieces of cardboard with standard PVA glue, a section of lino for the river and various offcuts of thin card and polystyrene.
Once all glued together, the bridge was thickly undercoated in black acrylic and then drybrushed heavily with dark earth (Revell 82), followed by a lighter dry brushing with Africa brown (Revell 17).  The river banks were painted Africa brown and then coarse shelly sand was added (using PVA), followed by some static grass.

Of course after I'd made this one it was decided that the scenario would instead be a Napoleonic one played out using 20mm plastics and therefore the bridge I'd just made would be too narrow.  So I also made this one which is about 65mm wide.
This was basically the same construction as the matchstick bridge but used wooden lolly-pop sticks instead.  The same painting technique was used which brought out the grain quite well and makes them look like oak planks or something.
Cutting off the rounded ends of the sticks with a pair of stout scissors made the ends a bit uneven with the odd chip-out, which gives it all a bit more character.  I'll describe the AAR featuring this latter bridge in my next post.

Wednesday, 15 April 2015

Airfix French Redux

I was going to title this post "Airfix French Refurb" but Redux sounds more French.  Oh, I dunno.  Anyway, I mentioned in an earlier post I was delving into other projects and I'm afraid to say that after more than 30 years I am revisiting the Napoleonic era.  I've bought some books and everything.
L'ordre mixte (French for 'what an odd mixture')
This stems from Geoff's logistical suggestion that, as the 15mm Napoleonic French and Austrians we've been using recently are at his house, why couldn't we use our old figures (which happen to be at my house) when he comes over for a game, to save him lugging his figures about.

As with much else in wargaming (such as the ACW period) we started with Airfix figures (with Esci, Italieri and some metal figures mixed in) and I still have most of mine.  But sadly many are not in a state to be used just yet on the table, being inadequately based on thin card and/or badly painted, or indeed not painted at all.  So this is one of the things I did this week.
These are the classic Airfix French Line Infantry, with their massive shakos and even more massive chests.  They are quite imposing figures I think but do dwarf other better proportioned makes such as Esci and Italieri.  Their best match in terms of size and style is in fact the Airfix British Line Infantry.  Still, they have a lot of character and to do a quick job I just gave them a basic '15mm style' paint job but not bothering with a shade coat.
A few of them started out unpainted but others had been lying there in gloss green as Brunswickers or some such, so all of that had to come off.  For preparation I washed them thoroughly and then gave them a thick undercoat in black acrylic.

The other figures I have that are already based are set up for WRG 1685-1845 rules (60mm x 20mm bases) (and before that the classic Bruce Quarrie rules) so I just made new bases by doubling layers of thick cardboard. 
Basing was done using my usual coarse shelly sand, painted Dark Earth, drybrushed and then with patchy static grass added.  The officer is an ancient conversion from an Airfix French Old Guard figure, which are considerably smaller than the line, but I think I got away with it this time with the bodged up shako.

Monday, 6 April 2015

WSS Danish - Regiment Prince Carl

There have been quite a few distractions of late, what with some new projects and a recent wargame AAR that I may post about (but without pics, as I managed to lose the camera).  However, I have finally finished the third of my Danish War of the Spanish Succession (WSS) regiments, thus completing Bielke's Brigade as part of my planned reproduction of Scholten's Danish command at Blenheim.  The previously completed regiments are the Livgarde til Fods and Prince George's Regiment.
As before these are Blue Moon (15mm/18mm) figures and my painting guide was a combination of CS Grant's books (The Armies and Uniforms of Marlborough's Wars Vols I & II) and the booklet by CA Sapherson (the Danish Army 1699-1715), both from Caliver.
Learning as I go, I made the contrast between the shade coat and the top coat as great as possible this time: the coats are a dark grey base overpainted with light grey and the facings and breeches are ochre overpainted with yellow.
I generally prefer Revell Acrylics, typically because the Tamiya paints I sometimes use can leave a slight sheen and I like my figures to be matt.  Also, if the Revell paints start to dry out a bit you can just add cold boiled water to them to thin them up again.

Anyway, a slight pause now for the WSS whilst I get on with a few other projects.  I have another three Danish regiments to paint, representing Rebdorff's Brigade, and then it's a toss up between choosing more Allies or painting up a few regiments of French to balance up the available forces.

Saturday, 28 March 2015

Campaigns and Earthworks

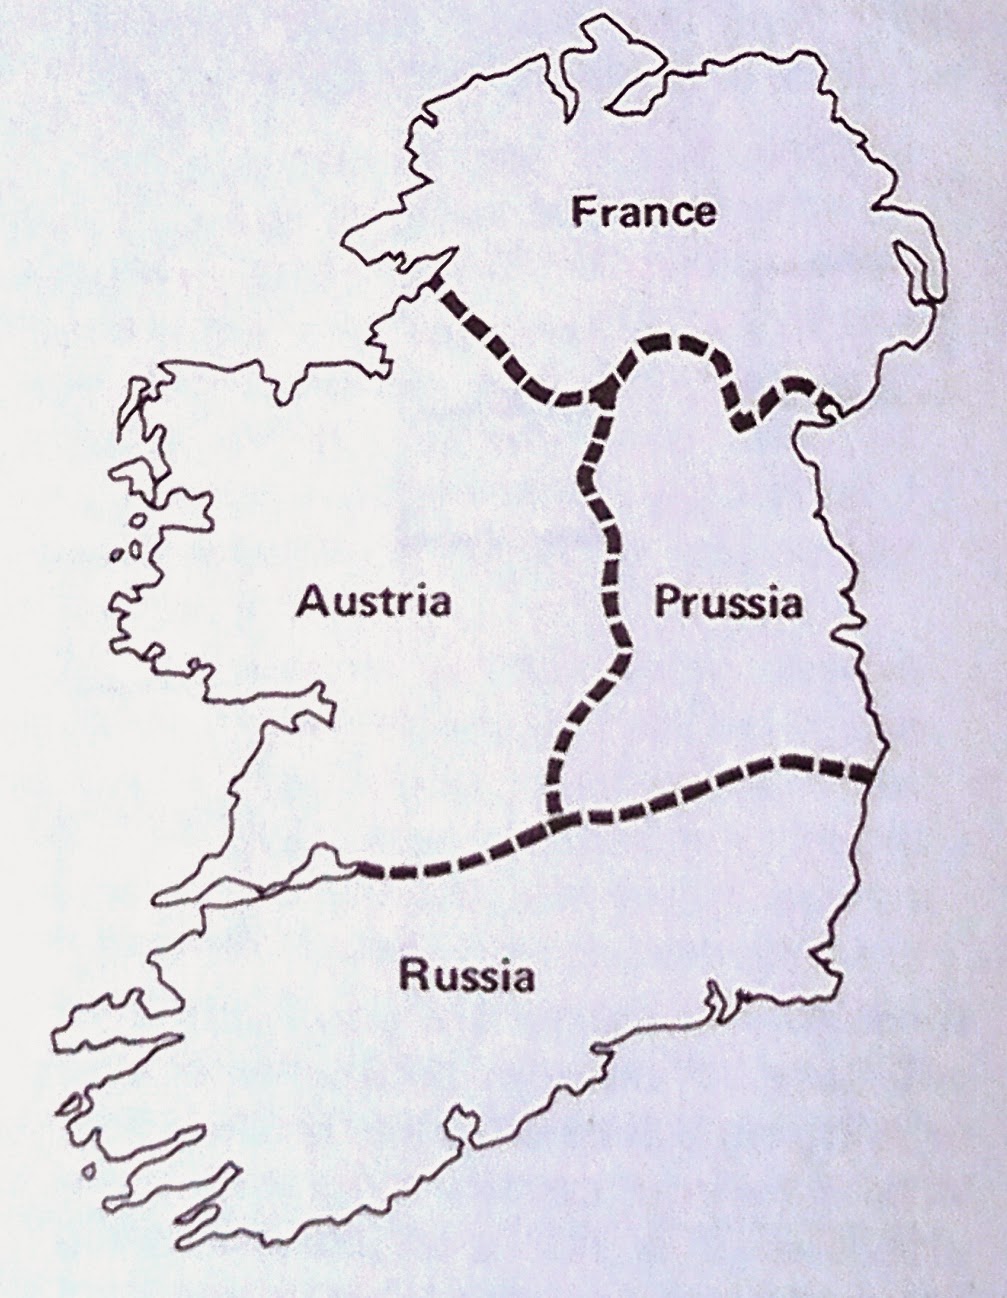
Wargame campaigns are funny things and we've tried a few over the years (and more are planned).  One of the first large scale campaigns we did used a somewhat truncated map of Ireland, over which we fought a bloody ACW campaign.
"Say cheese"
We decided to use Ireland as the basis for the map because a) Bruce Quarrie had suggested it in the Airfix Magazine Guide No. 4 "Napoleonic Wargaming" and b) we happened to have a map of Ireland.
Campaign Map from Airfix Magazine Guide No. 4
Not having access to a Xerox machine (this is quite some time ago) our map was made by (Geoff) tracing the master map and adapting it somewhat.
Hand drawn map of Ireland, somewhat adapted
Map movement was conducted using the classic matchbox chest of drawers method and battles were fought using the old Circa 1863 rules, which produced a gruelling, yet I think accurate, outcome.  Anyway, what has this got to do with earthworks?
Cautious Confederate attack on Federal positions
Well, one of the battles involved an attack by superior Confederate forces on a Union held village (Ballina).  It was judged that the Federals would have had time to throw up some defences and therefore it was necessary for me to make some earthworks.

Since then, these have lain in a box (only getting the occasional outing) but it was always my intention to fill in a few gaps and refurbish what I had already made, so this is what I did last week.
Stage 1: glue polystyrene to cardboard
Raw materials comprised strips of polystyrene pizza packaging (i.e poor man's foamboard), cardboard, matches, polyfiller, fine sand and PVA glue.  The polystyrene (suitably scored to allow it to key) was used to create the overall profile and then this was covered in filler.
Stage 2: profile with filler and attach matches
Once all this had dried out thoroughly I spread PVA glue thinly over the front slopes and added fine sand to give it some texture as the filler I had was too smooth (it was what I had to hand at the time). 
Stage 3: sit back, take out your pipe, and admire your handiwork
Everything was then undercoated in matt black and the earth slopes painted in a reddish brown colour (I used Tamiya XF-79 Linoleum Deck Brown) in order to match the pieces I already had.  The woodwork was painted with Revell Acrylic Dark Earth (82) and everything was dry-brushed with a sand colour.  And here they are lined up on the kitchen table with some Airfix soldiers manning them, veterans from the original battle.
A selection of what's in the box now
I was particularly pleased with the gun emplacements which featured in the battle mentioned above.
Suspiciously empty gun emplacement
You will notice that the emplacement I've shown is empty.  This is because, although the Federals had had time to prepare defences, they did not happen to have any artillery.

This was not known to the Rebels who approached very cautiously, only to find that the guns pointing at them, apparently fiendishly waiting until they got to cannister range, were merely tree trunks shaped and painted to look like guns.  Quaker guns.  Well, I laughed: but then I did say that campaigns could be funny things.

Tuesday, 24 March 2015

Roman Gaming Aids

I was just browsing the internet (and twitter) today and came across this interesting Roman gaming aid, which although it looks like a novelty cheese grater, is actually the Vettweiss-Froitzheim Dice Tower.

Allegedly also found was an extendable steel ruler and a blood-stained copy of WRG 6th Edition
It was uncovered in 1985 at the site of a Roman villa in North-Rhine Westphalia and dates from the fourth century AD.

The inscription translates as "The Picts are defeated. The enemy is destroyed. Play in safety!"  Clearly the person who owned this had spent time north of Hadrian's Wall.  But how could they know that the Picts would prove ultimately as indomitable as the Gauls...

Saturday, 21 March 2015

After the 100 Days: Longwood

The title of this post points in a couple of directions simultaneously.  Firstly, I realised that my previous post, concerning a brief AAR from a Napoleonic encounter, was actually my hundredth post, which by any reckoning is a milestone from when I started this blog almost exactly four years ago.  Secondly, I happened to be on the remote island of St Helena at the time I started the blog, and therefore there is a connection to Napoleon and his final 100 Days, this being the bicentenary of Waterloo and all that.
There is a lot of very interesting military (and other) history relating to the island, discussed here and here and possibly here, but as the photos have been burning a hole in my hard drive for four years I thought I'd post a few here of our visit to the final residence of Napoleon Bonaparte, at Longwood.
View from Diana's Peak looking NE towards Longwood, Flagstaff Hill and The Barn
The first thing is context and setting.  St Helena is approximately 10 miles by 12 miles across and is located in the South Atlantic, some 1,370 miles SSW of Luanda on the Angolan coast.  There is no airport (one is being built currently on Prosperous Bay Plain, not far from Longwood), so when we went there in 2011 your choice was three days from Ascension or six days from Cape Town (only 1,950 miles as the albatross flies), by boat.  We did both legs of the RMS St Helena's voyages.  Anyway, the above photo shows where Longwood is, hidden in the dark green ridge in the centre of the photo.  Flagstaff is the pointy green hill and The Barn is the one that looks like a barn.
Longwood House
Longwood itself is very small and is certainly not a palace.  In fact it was a farm before Napoleon was placed there - he never liked it and I can understand why.  It seemed damp and claustrophobic even when we were here.  For some reason I didn't take any pictures in his main living area - I think it was because it was so small, dark and depressing and there were too many other visitors there.
Napoleon's deathmask
The main features I noted were the deep copper bath he apparently spent a lot of time in and his bed, the one he died in.  The dining room seemed to have a bit more life to it but it was not particularly big.
Napoleon's dining table and chairs
The walls had few pictures of note - mainly portraits of Napoleon and some of his Marshals, including this one of Murat, looking a bit pleased with himself.  Perhaps because he wasn't trapped on St Helena.
Murat
Napoleon was clearly pretty miserable there and it is perhaps surprising that he lasted as long as seven years before he died in 1822.  I did scrutinise the wallpaper closely for signs of arsenic but they told me that, although it was the same pattern, none of the original stuff remained...
Flagstaff with flagstaff
Once the airport is built I am sure that Longwood will become far more of a tourist attraction than it is at present.  The Saints sort of try to make something of it when the cruise ships come in (they don't try that hard), although sometimes you have to be pretty observant to spot things, like this mannequin of Napoleon on the balcony of the Consulate Hotel in Jamestown.
Napoleon at the Consulate.  The bar is downstairs.  We referred to it as the Disconsolate.
He's actually looking across the road at the house that Sir Arthur Wellesley once stayed in on his way to India before he was famous, now called Wellington House.
Wellington House.  Since repainted, but still blue.
This picture of Wellington House was taken from our apartment which was across the road, and which happened to be on the site of the first house that Napoleon stayed in when he arrived on the island.  Anyway, enough of this, back to wargaming.