Saturday, 2 September 2017

Takistan Compound

Since coming back from holiday I’ve been avoiding committing to the plastic/lead painting mountain for some reason.  This is, I know, associated with some deadline pressures at work (which I’ve missed anyway, which makes it worse in a way as the extensions just mean they haven’t actually gone away).  
But when that happens making and painting individual terrain pieces is what I usually turn to, and as noted in an earlier post I have been making various 15mm desert type buildings intended for AK47, ancients (DMB) or even Mexico.
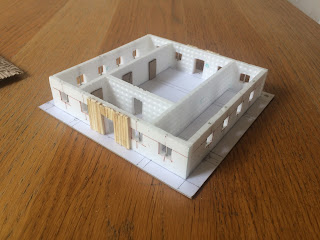
Anyway, here is one of the pieces I’ve made, a compound that wouldn’t be out of place anywhere in Central Asia or Africa.  This is actually based on the examples you can find on the 'Takistan' terrain, originally part of the ARMA2 'mil-sim' PC game, now ported to ARMA3 (using the CUP mod, in case you're interested).
Clearly the terrain is supposed to represent Afghanistan, although maybe it is meant to be Tajikistan (or, heaven forbid, the unpronounceable Kyrgyzstan).
Modelling was my usual technique of cutting strips of thin pizza-base polystyrene which were then glued together onto a cardboard base.  Everything was painted a chocolatey earth colour and then fine sand was stuck to the walls (with PVA wood glue) and a coarser sand glued to the ground.   Walls were then painted in shades of sandy earthy colours with various washes to dirty them up.
Some static grass was added in various places and a tree put into one of the corners.  This is a piece of heather stem (we have a lot of it lying around in Scotland) with some of my home-made clump foliage stuck to the top.
I’ve a plan to make a whole forest of acacia trees using the bag of heather I collected a few years ago, but haven’t got around to it yet.  Overall, the compound turned out quite well and makes a contrast from the mainly white-walled 15mm buildings I also made, which I will post about later.
 
I may make a few more of these ‘Takistan’ type buildings but we shall see how much time, inclination and not to mention storage space, I have to do that.
Russian on the roof

Saturday, 26 August 2017

Claymore 2017

Well, it was a few weeks ago but I've finally got around to posting about Claymore 2017.  Sadly I was only able to be there for a couple of hours and didn't really get to speak to anyone but I did take a few pictures, which I thought I'd share.
First up is a very nice Napoleonic game pitting Bavarians (with some French backup) against Austrians.  I think this was put on by Falkirk and District Wargames Club using General d'Armee rules.
The figures were beautifully painted but as you can see it was early in the engagement so there wasn't much blood on the uniforms, yet.
Near it was a 'Halo' participation game that my teenage son spent half an hour on, so I have to show it.  Lots of dice to be thrown so I think he enjoyed it.
As usual the crew from Tyneside where there, using their versatile 'Great Captain' rules.  This year it was a battle outside the gates of Troy.  They always have a lot of figures on the table.
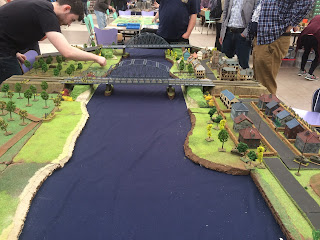
A particularly impressive game was the Crossing the Waal game (Nijmegen) during Operation Market Garden.
I've got a similar bridge myself, though made out of cardboard.  We played similar games ourselves in the past so this was fun to see.
A particularly colourful game was an 1877 Russo-Turkish War game and an attempt by Russians to force their way through a pass defended by Turks
Looked a bit tricky, particularly as the Turks were well placed and had all the high ground.
Another impressive game was the Burma 1944 Bolt Action demonstration put on by Chris & Pat Brown/Aberdeen Wargames Club.  I'd meant to say hello but it was so busy I couldn't get near them.

There were lots of things go on on that table but unfortunately I couldn't stay to see how it turned out.
I liked the Beaufighter on the airstrip.  One of my favourite aircraft, though sadly this one was a bit worse for wear.

Finally, there was this small game set in Indonesia (1962-66), one of those British end of empire 'police actions' that we aren't taught about in school.

There was certainly an impressive amount of foliage on the table and it has reminded me that I have a large box of plastic aquarium plants that need attending to.  Apparently there are some orangutans on the table though it was not clear which side they were on.
Anyway, despite only being able to spend the morning there, I was more organised than usual and actually had a few lists of things to buy should the appropriate traders be there.  I'm therefore glad to announce that I managed to add to my Blue Moon Malburian lead pile and also impulse bought this from Helion Books.
I'd never seen this series of books (Africa@War) before, but they are very interesting to me as I've got a couple of AK47 type armies looking for some inspiration.

The series has one on wars and insurgencies in Uganda (1971-1994), and as I know the country quite well (and have stumbled across abandoned munitions myself in allegedly undisturbed savanna) that is one of the series I intend to get.

Tuesday, 20 June 2017

Tembe in 15mm

As promised in my previous post, here is the tembe I made.  For those of you who don't know, and I didn't until last week, a tembe is a square African building used by nineteenth century Zanzibar slavers and such like.
Apparently the name indicates its intrinsic squareness as opposed to the normal round huts that everyone lived in during that period (and still do, in some places, as I have seen for myself in Uganda).
Such buildings were used to keep the slaves in (and to stop other slavers stealing them) before shipping them off to wherever they were sold to.
The inspiration for building this (in 15mm scale) was the recent article in Wargames Illustrated magazine (No. 356), where a 28mm building was showcased.  The version featured was made of mdf and had a thatched roof.
However, it struck me that a tembe could have a variety of uses in various periods and locations including ancient near east (as a villa), nineteenth century Mexico (a hacienda) and of course modern Africa, to complement my Peter Pig AK47 armies (as a police station, customs post, or similar).

From the African angle my reasoning was that the building may have been an old tembe that had had a new roof added, which is why I changed the roof to what could be interpreted as tiles (or corrugated iron) instead of thatch. 
Construction was my usual pizza-base polystyrene 'foamboard' stuck to a cardboard base.  The roof was made from corrugated cardboard; actually the cardboard insulating sleeves that you can pick up with take-away coffee.
Around the doors I stuck on matches to represent a timber finish and bars were put on the windows.  These were actually cut from some thick wire - the low 'E' string I'd removed from my electric guitar (a beautiful 'Artists' Series' Ibanez AR420-VLS) when I changed the strings recently.

Ibanez AR420-VLS
For this model (the tembe, not the guitar) I made the roof removable.  This was then undercoated in black and roughly painted with a rusty terracotta colour.  All of the walls were painted in the chocolatey brown colour I normaly use and then coated in PVA glue and covered in fine sand. The floor of the courtyard and the surrounding ground were done in a coarser shelly sand I use for basing figures.
The sanded walls were then painted off-white with smoother areas left the undercoat colour, as though the plaster had fallen off in places. Walls were dirtied up with various washes of dark earth.  Interior rooms were painted black.
The ground was painted a sand colour with some static grass (recently acquired from WWS) added.  Overall, I was pleased how this turned out, as well as its potential versatility for various periods as mentioned earlier.

Friday, 9 June 2017

Step Right Up

As always seems to be the case, I have multiple projects on the go at the same time, hardly ever finishing any of them completely.  This usually happens when I have figures to paint and then I come up with a displacement activity instead.  I don't know why because when I get going I actually enjoy painting figures.  Anyway, this week it has been making/ refurbishing buildings for various things.
This post is about the 'Indian Mutiny' buildings that I have been working on.  This has been in response to dangerous talk with Geoff about him getting his old Foundry figures out again for some skirmish games using the WRG's Fire and Steel rules.
To contribute to this initiative, I dug out the old buildings I had in the box and repaired, refurbished and touched up the paint on them a bit.
I don't have any Indian Mutiny figures so have illustrated them with some 28mm Copplestone explorers instead.
In addition, I added a new building, made in my usual way from polystyrene foam pizza base (poor man's foamboard) and cardboard.  I just stick everything together with wood glue (PVA), scoring the polystyrene edges as neccesary to enhance adhesion.
The idea was to make a slightly larger building with some steps up the side and flat roofs for figures to stand on.  As with most of the buildings I make these days I don't make them enterable, which means they are more robust as I can just glue everything together (and don't have to paint the inside).
As you can see, the offcuts of cardboard I stuck on the outside make the walls more uneven, implying some extra strengthening, rather than being the flat slabs they would be otherwise.
After construction was finished I painted all surfaces with some tester-pot emulsion paint I'd picked up years ago.  It's called 'Fired Earth' and is a sort of milk chocolate colour (used here for example).  After that I coated everything with wood glue and dipped the building in a large tin of fine sand I have.  I undercoat first and then do the sand texturing afterwards because the wood glue sometimes doesn't spread evenly over the smooth polystyrene.
Walls were then roughly painted in some off-white emulsion and then dirtied up with various washes of Revell Dark Earth.
Finally some static grass and small bits of my home-made clump foliage were added.
The thing about buildings though is that I never seem to make them one at a time, preferring a sort of batch process.  A back-up displacement activity perhaps.

In this case I made some similar 15mm structures intended for ancient (DBM), modern Africa (AK47) and/or possibly mid-nineteenth century Mexico for the Maximilian Adventure (not that I have any figures for that, yet).
I'll post about that lot when I've actually finished them, plus today I saw an interesting article about building a Zanzibar slavers' tembe in this month's edition of Wargames Illustrated (No.356), which I am finding difficult to resist...

Saturday, 29 April 2017

The Weather Where You Are

Geoff got me an ex-library copy of Charlie Wesencraft's classic Practical Wargaming a few years ago.  It was one of those books we used to take out of Edinburgh Central Library on a regular basis (my copy is from the Lancashire County Library, first borrowed in March 1975, with the last date stamp being 27 Feb 2008.  Nobody needs to know that but I thought I'd record it anyway).
However, not just being a trip down memory lane the book does actually have some interesting ideas in it, not to mention some arresting expressions.  The one I always remember in the discussion about missile fire is that we are not supposed to be interested in whether a particular infantryman 'successfully stops an arrow with his chest', a phrase which I still find funny, if a little macabre.
Fun with hardboard and paint
Anyway, in the Preparation for Battle chapter, there is a discussion of the effects of weather on battles and instructions on how to make and use a weather 'barometer'.

The illustration from the book explains how it is used, which is basically to throw 2D6 at the start of the game to find a starting point between '2' at the top (fog) and '12' (storm) at the bottom and then move the red peg up or down (or not move it at all) depending on die throws each move.
Weather barometers and funk boards: the epitome of 1970s wargaming
As you can see I added an extra section at the top, which is not actually part of the barometer but where the string goes so I can hang it up.

So it will be interesting using this in our next game.  However, I would like to add that, based on a Scandinavian book I had as a child (I still have it), the word 'barometer' is inextricably linked with the word 'foreboding'...

Monday, 17 April 2017

Another Barn Conversion

My previous post was about making a (15-20mm scale) covered structure to go over a bridge I'd constructed even earlier.  However, looking for a small project in between my various trips this year I decided to use the 'barn' for another purpose.
In this case I made a base for it so that the 'barn' could be used as a free-standing structure.  The base includes internal walls and doors at either end.  The objective was to make a ruined substructure that would be revealed when the barn was supposed to be damaged due to shell fire or arson (or inclement weather?) during a game, a suggestion taken from various old-time wargame books.
As you can see, removing the barn would therefore reveal the remains of the ruined barn beneath it, but with enough space and absence of clutter to place troops as necessary.
Construction used the usual mixture of matches, wooden stirring sticks and cardboard.  The sub-structure was designed so that the barn would be held securely in place until it had to be removed.

After putting it together, everything was undercoated in black and then heavily dry-brushed in dark earth, with sand highlights and various coats of thin black wash for shadows and emphasis.

Friday, 10 March 2017

Barn Conversion

Wargaming is a life-long hobby (at least in my case) and there are often things that we've planned to do at some point but have never managed to get around to, until much later.
I am as guilty of that as anyone.  However, the good news is that I have recently managed to complete one of those little projects that was first jotted down some considerable time ago.  In 1987 to be exact.
This is a sketch I made in my wargame journal when I was still at university and we were in the middle of an ACW campaign, partially conducted by mail (the old fashioned kind with envelopes and stamps and things like that).  It was my idea for a covered bridge, or barn bridge as I referred to it.
After making some wooden bridges as recently as 2015, I realised I could use one of them as the basis of my long-planned barn bridge.  Construction (in approximately 20mm scale) comprised a basic internal sheet-polystyrene structure with cardboard roof and walls.  To the walls I glued matches and on the roof I put cut sections of those wooden stirrers you get in coffee shops these days (presumably because the public can't be trusted with teaspoons).
Once the glue was dry, everything was undercoated in black and then liberally dry-brushed in Revell Dark Earth.  Highlights were added with a rapid dry-brushing of Revell Afrikabraun (sand colour).  After that was done I finished off with few coats of thin black wash in selected places to intensify edge contrasts and shadows.
As you can see I made the 'barn' section so that it would fit neatly over the bridge I had made previously, so I now have two bridges for the price of one.  It's only taken me thirty years but some things with a long gestation period are worth waiting for.