Thursday, 31 March 2011

Russo-Japanese War

The first time I came across the word 'Tsushima' was in Paul Hague’s Sea Battles in Miniature.

It had never occurred to me before (it was a long time ago, I was young, I was innocent, what can I say) that there would be wars out there in which the British weren’t involved (that is if you discount the little Dogger Bank Incident where the Russian Baltic Fleet opened fire on British trawlers, mistaking them for Japanese torpedo boats – in the North Sea? I ask you.... ).

Anyway, yet another long term project of mine is building up fleets and refighting the naval aspects of the Russo-Japanese War. To this end I recently found this excellent map of the Japanese Empire in 1904/05.
I’m going to work this up in the Berthier Campaign Manager to hopefully try to run it as a campaign (at some point) so I’ll let you know how I get on with that.

Wednesday, 30 March 2011

St Helena - Jamestown Lines

I mentioned in an earlier post that I am currently somewhere remote (more remote than Scotland, that is), but did not specify that I am actually working on the (substantially remote) South Atlantic island of St Helena, famed for keeping Napoleon out of mischief for the last few years of his life.

In case you’re not exactly sure where St Helena is just imagine you're steaming east from Brazil and if you find you’ve hit Angola then you’ve gone too far (St Helena being about 1,200 miles west of the African coast). As there's no airport (yet) it takes 3 days by boat from Ascension Island to get here (and Ascension isn't easy to get to in itself) so that by any standard is ‘remote’.

Since St Helena’s discovery in 1503 (by the Portuguese) and its eventual occupation by the English in the 17th century, fortification building has been a major past-time on the island. There are many of these defensive structures still in existence and I’ve managed to get around a few of them in my short time on the island.

The most prominent of these is actually at Jamestown itself, which is the capital of St Helena and is located at the island’s most sheltered anchorage. The town is squeezed into a deep ravine with very steep hills more than 200m high on both sides.

Not surprisingly there are substantial fortifications commanding the bay, not least the curtain wall, two half bastions and a dry moat that separates the town from the sea, the Jamestown Lines. These were built between 1708 and 1714 by Governor Roberts. Here is a photo from 1862 of the defences taken from above West Rocks.

As the battery position from which the 1862 photo was taken is now inaccessible due to rockfalls, I took this picture from the eastern side from the track leading up to Munden’s Hill (about three hours ago).  As you can see the defences are pretty much as they were (apart from the swimming pool and outer sea wall - which is actually under construction in the 1862 photograph) and apparently represent one of the best preserved examples of East India Company fortifications in existence.
And speaking of Munden's Hill, here is one of the 9-inch 12 ton rifled muzzle loaders (RML) lying behind the emplacement at Munden’s Hill battery at an elevation of about 150m above James Bay.   From what I've read it was probably removed in the early 1900s.
It is quite unusual to see these still about because normal practice when guns were decommissioned seemed to be to heave them over the cliff...

Sunday, 27 March 2011

ACW Positional Defence - Part 2


The Rebel attack started with a general advance all along his line (no call for subtlety here). However, I hadn’t quite clocked how strong the attack on my left would be with a total of six Rebel regiments against two Union regiments backed up only by the battery in Redoubt C (see previous post for battle map and set-up).

Splitting what little infantry I had on the left I sent a regiment of Zouaves into the woods at the far left to counter Rebel infiltration on my flank, whilst one Union regiment was moved forward to close the gap between Village A and Redoubt C.

 
My thinking was that maybe I could keep the Rebels at arm’s length while my batteries in the redoubts could cut them up and perhaps weaken them enough so that I could hold on to two of the three objectives by the end of the game, as required by the scenario. Meanwhile, in the centre the Rebels advanced steadily (perhaps suicidally) towards Redoubt 1.
  
However, back in the gap between Village A and Redoubt C, things didn’t turn out too well, as you can see from the before and after photos below. Somehow, I think that the ‘effectiveness’ of these free Cold Harbour rules could be tweaked a bit!
Before: (What? Outnumbered four to one? Piffle!).


After: (Bang! Heh-heh ... er... how come we missed one?)


Having swept the opposition away in just a few short volleys and with unerring accuracy (with the dice at any rate), the Rebels rushed forward to clear the gap, sending a further regiment confidently on to assault Redoubt C, as shown in the photo below (way in the distance, beside the wood).  
In the foreground the Rebels were already occupying Village A, trampling though gardens and vegetable patches in front of Redoubt 1. Wasn’t I supposed to hold on to that objective? Here is a view of Redoubt 1 (Spencer Smith general in the background).
 
Back on the left, the unit attacking Redoubt C did take some casualties, before the Union battery started to waver (note Union Zouaves reforming in the background as more Rebels advance through the woods).


Meanwhile the Rebel advance through Village A towards Redoubt 1 was not faring so well and these units suffered, although not before picking off my artillerymen, with some help from their supporting artillery (see below, view from Union left flank).


Unfortunately with the Confederates poised to overrun Redoubt C and already in possession of Village A, as well as Redoubt 1 cleared of Union artillery, we ran out of time. Another few moves, though, and I think that the Rebels would have quickly got behind Village A and started to roll up the remaining Union forces and would have won the game decisively. 

Overall, an interesting scenario and one to try again another day, but not much of a thumbs up for the Cold Harbour rules, which were a little too bloody for the brigade size games we normally play. I’m all for decisive results but am not so keen on losing 95% of a regiment in the space of two moves after a few good die throws!

Nevertheless, it was good to get the old troops out (and the terrain), and hopefully they’ll get an airing again sometime soon.
Regarding other ACW rules I’ve been keen on Circa 1863 (Tabletop Games), with some slight modifications, for a very long time, having won many grinding, bloody, ebb/flow, and intensely satisfying battles in the past with them. They do take some time to play though but we usually seemed to have more time in the old days. However, I am now looking seriously at Regimental Fire & Fury, which I’m hoping to try out for our next outing.
 

Friday, 25 March 2011

ACW Positional Defence - Part 1

There are many great wargaming books out there and one of the best is Charles S Grant’s Scenarios for Wargames (1981).   A little while ago, my brother was keen to try out the free ACW rules Cold Harbour (from freewargamesrules) and so we decided to use the Positional Defence scenario to do this.  This is our version of the scenario map, done in MappingBoard.
The main idea of the scenario is that the defender (Union) has to fight off a determined Rebel attack and retain control of two of the three marked positions by the end of the game, comprising the villages A and B, and redoubt C. 


The scenario requires that the Rebels start on the baseline and Union troops cannot start further forward than village A.  Forces, modified from the scenario book, were as follows:

     Union                                 Confederate
4 regiments                             8 regiments
3 batteries                               2 batteries

The Union forces (mine) appeared to be a bit outnumbered but on the other hand had the benefit of a strong defensive position (and 3 redoubts to hide behind).

We played the game on our usual 6x4 ft table and it gave us a chance to give our old plastic 20mm Airfix/Revell/Esci troops an airing.  Also, all of our terrain is entirely home made and is the product of concerted effort over the last three and a half decades.  We’ve been through a lot together so it’s always nice to see them on the battlefield again!

Starting dispositions, viewed from the Union right flank, are shown on the following photo.

 I decided to spread the Union forces quite evenly with a battery in each redoubt and with one regiment placed midway between villages A and B, one regiment behind village A and two regiments placed to defend the gap between village A and redoubt C.  This was where I thought the rebels would try to get behind village A and/or isolate redoubt C. 

The Rebel forces were placed along the baseline, and as one might suspect, were concentrated on my centre-left opposite the gap between village A and redoubt C.  In addition, the crafty Rebels had placed some troops ready to infiltrate the woods on my far left flank.

The battle report will follow in the next post.

Friday, 18 March 2011

MappingBoard

I can’t remember who I got the link from (freewargamesrules, I think) but I recently discovered some free (donationware) wargame mapping software called MappingBoard.

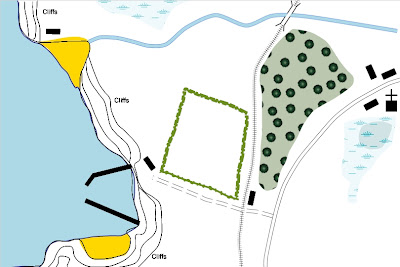
As I’m currently based somewhere remote (more of that another time) I’ve had the time to teach myself the basics of making maps with it.  It took me about 30 minutes of mucking about until I came up with the effort shown here.  I have to say that I’m absurdly pleased with it and would highly recommend this nifty piece of software.  It's very useful because you can, for example, import textures to fill certain terrain types (standard ones are shown here) and once you have created a feature you can save it for use again on another map, which is very handy if you have terrain pieces of certain shapes you use regularly.
I'd been looking around for a quick computer based map making system since coming across the simple yet elegant Magna Graecia wargame campaign system a few years ago (and slowly fighting a DBM campaign to a standstill with it),   If you check the Magna Graeca link, you’ll see that movement on the campaign map is between ‘nodes’ and for each node, there is a link to a unique battle map.

Linking maps to locations works very well with the Berthier Campaign Manager (another brilliant and free programme) as it allows you to assign an image (of a map say) to any square on the campaign map.  If you can’t be bothered making a map for each square (and on big maps there are literally fahsands of ‘em) you can either place them at certain ‘nodes’ or perhaps assign values to them and look them up using the reference tables.

That said, I like the idea of the generalship of choosing exactly where to give battle rather than generating maps randomly as you turn up in the square, so associating maps with certain squares is a very useful feature.


Another good thing about the Berthier system is that when there is a contact it indicates from which direction each army entered the square, which can be very useful for making sure you start off on the correct side of the table (perhaps both on the same side if you’re being chased on).

So there you have it - a nice little programme for making up battlefield maps (and a big thumbs up for Berthier, as always).  Hopefully, you'll be seeing more of these on this blog.

Brian


Sunday, 6 March 2011

The Wishful Wargamer

Hello there.  This is my first ever post in my first ever blog so bear with me. 

I spend a lot of time thinking about wargaming but very little time actually playing games, hence the Wishful bit in my blog title  (I toyed with 'Wistful' but that made me seem a bit poignant and sad).  That said, I wanted to make a record of my various activities related to thinking about, planning and preparing for wargames and, hopefully, occasionally reporting on such encounters.  And as blogging is essentially a self-indulgent and potentially egotistical pastime, I may make the odd non-wargame related post, but only if it’s relatively interesting, in the scheme of things.

So, as is traditional, here is my version of that oft heard tale about "how one got started in the hobby".
I've been pretty much involved with wargaming since the early 1970s, playing with Airfix soldiers with my brother (British Commandos, Romans and Ancient British being the earliest that I can remember).  From basic, last man standing style, 'wars', which involved lining all our troops up behind defences and then throwing lego bricks at them (graduating to firing matchsticks from Britains field guns) my brother, and then I, discovered the existence of wargame rules.
The first of these were the (still enjoyable) Airfix guides, principally Bruce Quarrie’s WW2 and Napoleonic wargaming books.  Amongst many others, subsequent and influential books that I have to mention include Operation Warboard by Gavin Lyall and Sea Battles in Miniature by Paul Hague.

Oddly, it was only later that I discovered Donald Featherstone and all the rest of the greats.  To be honest although I’m not a classic wargamer (I’ve never read Charge or relied on Don’s earlier works, preferring his Advanced Wargames and Wargame Campaigns) I’m still a bit old fashioned and need a lot of convincing to change rule sets (doesn’t stop me buying and reading them though).

So, with regard to rules I’m a bit of a stick in the mud and I generally like to stay with what I know (WRG, I salute thee).  I’m going to post my thoughts on the various rules sets I’ve tried (or more likely just read), in later entries, so you can all look forward to that (or not, as the case may be).

Anyway, I’m looking forward to this blogging lark and I hope you are too.

Cheers

Brian