We have been playing a mini-campaign based on a branching sequence of scenarios taken from Neil Thomas' book
One-Hour Wargames. The approach to the campaign is set out
here. So far we had played two games,
Scenario 16 Advance Guard and
Scenario 14 Static Defence, and as I won the last game in the sequence (and to be honest the one before that) I got to select the next encounter.
 |
| All quiet on the Eastern (Anatolian) Front |
This is therefore the AAR from the game we played (in February), 13 Escape, which to be frank turned out to be a bit of a dud, so I couldn't be bothered wrting it up at first, but then for completeness (and due to some time on my hands brought on by the Covid-19 lockdown) I thought I should.
 |
| A simple plan |
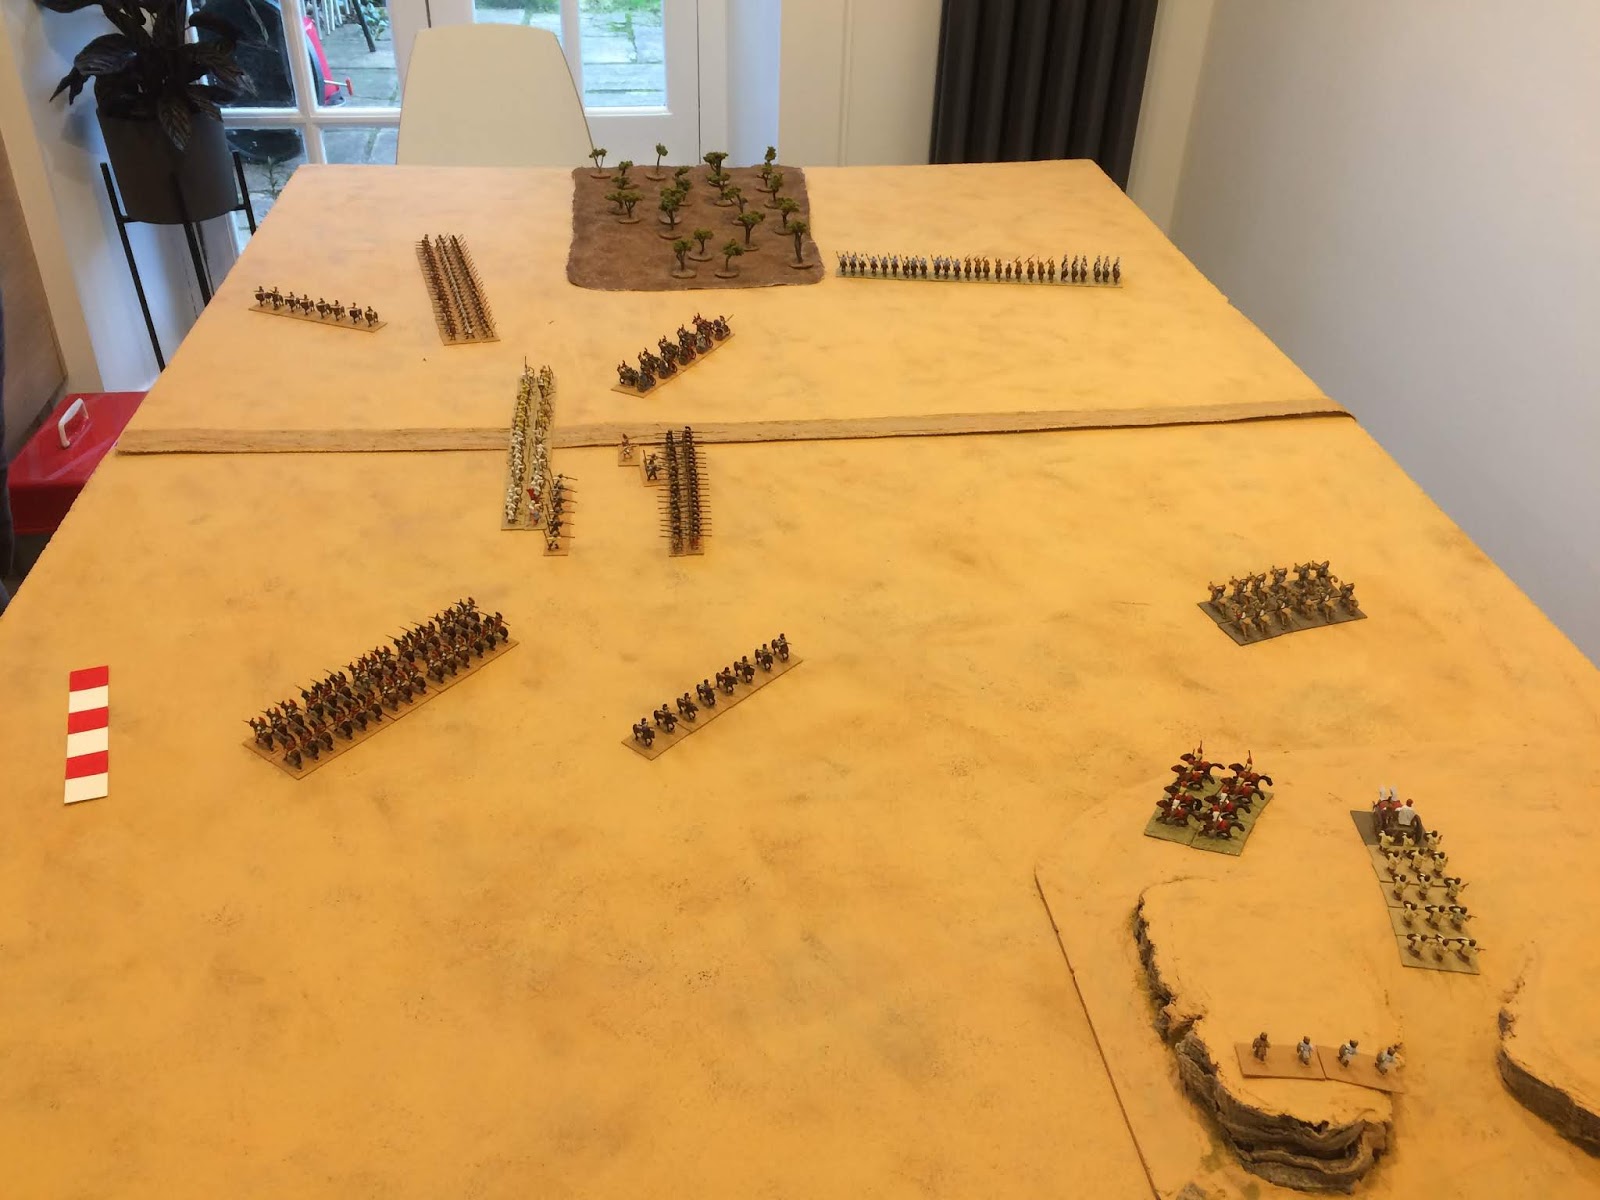
The book describes the situation thus: "The blue army is returning home from raiding Red territory. Its journey is blocked by a number of Red units." The scenario gives both sides six units, with the Reds having one unit on the table, two units coming on from the hill (marker 1, see map) at turn 2, two units arriving on the table from behind the wood (marker 2) at turn 4 and a single unit coming on at marker 3 on turn 6. Blue's objective was to get at least half of its units off the far end of the table via the road.
 |
| Lydian start line |
For this game we decided to get our old De Bellis Multitudinis (DMB) armies out as we'd not used them for quite some time. The scarpering Blues were therefore my Lydian (I/50) army and the blocking Reds were Geoff's Early Achaemenid Persians (I/60). The single Persian unit allowed on the table was a line of Sparabara blocking the road.
 |
| Sparabara in the way, again |
The game got off to a rapid start, particularly as we both suddenly realised/remembered that the rules allowed our units multiple march moves when not in close proximity to the enemy. This meant that, with some excellent PIP dice throws, within two moves the Lydians were nearly halfway across the table even before the Persian pursuit force could get their boots on.
 |
| Lydians advance (very) rapidly |
The Persian's plan seemed to be to use their numerous cavalry as the pursuit forces and the first of these appeared over the hill at move 2.
However, the Lydians continued to push forward, not only in the centre, to engage the Sparabara, but also on the flanks, in order to encircle the Sparabara if necessary but also to allow a rapid exit off the table if possible. Meanwhile, some Lydian (Paphlagonian) light horse turned to face off the Persians streaming down from the hill.
 |
| Nice bit of flanking |
The problem for the Persians was that they were never really able to catch up. Whilst the Lydian hoplites and psiloi were squaring up against the Persian Sparabara in the centre, the Lydian cavalry, chariots and auxilia were literally flowing round the flanks behind them. However, the Persian cavalry was still too far away to be effective.
 |
| A confusing picture |
As can be seen from the above picture, the Sparabara (white and yellow tunics, pale green base) in the centre, have been contacted by Lydian psiloi, whilst other Lydian units flow around the sides. The Persian cavalry meanwhile is mostly still on the hill or behind the wood on the right of the table.
 |
| Lydian hoplites push back Persian Sparabara |
In the centre the Lydian hoplites finally reached the Sparabara and started to push them back. The Persian cavalry was still in pursuit but was having trouble reaching any of the Lydians, apart from the Paphlagonian light horse sent back to delay them.
 |
| Paphlagonian light horse verses Persians |
Meanwhile, most of the other Lydian units were getting close to the table edge preparing to exit. As DBM is a bit flexible when it comes to defining units, we had decided that the Lydians needed to get half of their original number of elements off the table to win. And then, finally, some Persian Immortals turned up.
 |
| Persian Immortals - better late than never I suppose |
As can been seen, the Immortals were somewhat outnumbered by the hordes of Lydian auxilia. But in the end, it didn't really matter, because the Lydian cavalry was already streaming off the table and most of the auxilia would soon follow suit.
 |
| I'd be worried if I were you |
Fundamentally, the Persians never really managed to catch up with the Lydians, slowing them down or delaying them enough so that they could be destroyed. I think this was a reflection of the DBM rules which allowed march moves so that the Lydians were always too far ahead.
That said, one of the things about the OHW scenarios is that the table set-ups are very simple with not many features on the table. This means that there is very little tactical use of terrain and the issues (and interest) that that can cause can be missing.
However, one thing I did notice from re-reading the OHW scenario was that it is based on another scenario from the really excellent CS Grant book Scenarios for Wargames (WRG, 1981), in this case Scenario 10, Breakout. In fact, a number of the OHW scenarios are simplified versions of the ones created by CS Grant.
 |
| Every wargamer should have one of these |
Looking at it after our game it was clear that the Breakout scenario is a more complex and potentially more interesting set-up than the one in Neil Thomas's book (plus there's a bit more terrain to deal with), and to be homest I wish I'd realised that earlier.
Therefore we decided that for the next game in the OHW campaign series, if there was an equivalent source scenario, then we should try using that, rather than the simple scenario in Neil Thomas' book. Which is exactly what we did for the next campaign game that I will write about (when I get around to it), Scenario 7: Flank Attack (2).
[In case anyone is interested in the figures, my Lydian army comprises almost exclusively 15mm Chariot (now Magister Militum) figures, whereas the Persians are Essex, all painted and based a very long time ago...]


1 comment:
The problem with some of the OHW scenarios is that they are designed for the OHW rules and don't always work as intended with other sets. Yours highlighted an isue if you have games with march moves. Others don't work so well if you have short, sharp combats instead of OHW's attritional combat. Square-grid games have to deal with the scenarios where action takes place along a diagonal.
So sometimes the scenarios have to be tweaked for the rules a little.
I noticed you were using a rectangular table, with the escapees going across the width. Try it with them having to run down the length, maybe, or simply use a smaller, square, board.
Post a Comment