Showing posts with label Terrain. Show all posts

Sunday, 8 February 2026

A Century of Conifers

This month I decided I needed more trees, particularly conifers, and I thought I could make them.  After watching a couple of videos on how to construct pine trees suitable for model railways in the Rockies, I had a go.  My aim was to make trees that would suit 15mm scale down to 6mm.

Württembergers (15mm Warrior) emerge from the forest
This required a simple plan of taking pieces of kitchen scourer (from Poundland) and then impaling them onto cocktail sticks.  The original intent was to follow the videos and tear the scourers into sections, but this ended up being too much effort.
Basic ingredients
I had also initially tried to push the sections of scourer directly onto the sticks but quickly realised I'd need to make a hole in them, otherwise they wouldn't go on, hence the spike (from a biology dissecting kit).

T-55 (6mm Heroics and Ros) in the woods

Before adding each section of scourer I dipped the end of the cocktail stick into some thick PVA (wood) glue so that everything was secure.

Coniferous cubism
Tearing the scourers into sections proved to be tedious and time consuming, so for most of the trees I just cut squarish sections of scourer instead and slotted those on, trimming them into shape later.

A tin of unpainted trees

Finishing the trees required giving them a generous wash of dark brown acrylic then spraying them dark green (Army Painter Angel Green).  Minimal highlighting was added using the scrapings from various pots of green paint I had on my workbench.
Brown before green
Basing involved cutting the cocktail sticks to shorten the tree trunks, then using my new hot glue gun to fix them to 30mm diameter mdf (from Warbases).  These were finished with my usual coarse shelly sand that was then given a wash of dark brown acrylic paint (no dry-brushing required).

A century of conifers
Overall I made exactly 100 of these, hence the reference to 'century', which also hints at how long it felt sometimes it was taking me to make them all.

Tuesday, 11 July 2023

Airfix Gun Emplacement

This is a post about the famous Airfix Gun Emplacement, or at least what's left of the one I had many years ago.
Airfix Gun Emplacement

Actually, there isn't much left at all, just the two bunkers, with the base and match-firing gun long gone.  Furthermore, the octagonal bunker was at some point converted into a pillbox by cutting some rough holes in the sides, but this was never very satisfactory.  Consquently I thought it was time for an upgrade.  And here it is.
Gun Emplacement Bunker conversion

For this small project I decided to have the pillbox sitting in a base, which is made of a couple of layers of polystyrene foam.  Once shaped, the base was covered in rough sand, painted in earth tones and textured with flock, adding cloves from the kitchen spice-rack cut down to look like tree stumps.

Airfix gun emplacement pillbox conversion
In addition, I constructed some 'concrete' walls around the entrance, textured to look as though wooden shuttering had been used to form them; a technique I believe the brutalist French architect Corbusier was very fond of, as were the German occupiers.  In my case, this effect was done by gluing wooden coffee stirrers to a thin foam core and then painting them to look like concrete to match the repainted pillbox.
Airfix gun emplacement pillbox conversion
The pillbox actually lifts off so figures can be put inside.  Furthermore, considering the gun emplacment set is not being made any more (at least at the time of writing), I may yet construct my own scratch-built version of the entire model, built around this remaining element.

Friday, 29 July 2016

Affordable Ruins

Further to a previous post where I made some 1/300 scale 'affordable housing' I thought I'd construct some ruins to go with them.
The aim was to make beaten-up versions of a few of the undamaged buildings to replace them or to be standalone, as required.
My construction method was the same as before using polystyrene packaging (poor man's foamboard) and cardboard.

Before and after, sort of.
Wooden floors and roofs were devised by scoring and nicking coardboard sections, with some rafters and additional beams glued in place as required.
'Nice bit of planking'
The various planks, bricks, tiles and rubble were easily made by taking thin slices of cardboard (using a scalpel) and cutting them into appropriately sized bits.
Everything was glued together using standard PVA, with judicious placing of rubble piled up within and around the walls.
The models were then undercoated in black acrylic and painted in similiar colour schemes to the houses I'd made previously.
So, that's plenty to be going on with for now.  I was thinking to do some bridges next and then some roads,so watch this space.

Saturday, 25 June 2016

It's Clump

Taking a break from the fascinating political turn of events that has happened this week in the UK (i.e. Brexit), my thoughts have turned (naturally) to wargame scenery.  Actually, there's no link at all but it's been an odd week.  Anyway, basically, with a certain amount of economic turmoil likely to lie ahead, my idea was that it is always good to save the pennies and, needing some scenery material, I decided to make my own clump foliage.
Sponges
This currently costs about £10 for a large bag but, with a small amount of effort, you can make it yourself much more cheaply.  My starting materials were a packet of kitchen sponges that I got for a pound (in the pound shop) and my plan was to use the method described in detail in the Shedwars Blog.
Billy Whizz
Therefore, the first thing I did was to cut up the sponges into small pieces with scissors and then whizz them up in an old blender, adding a little water to make it easier.  You can see what the product looks like in the bowl on the left
Like cake, only more so
This bowl has four sponges worth of bits in it, with most of the water squeezed out, to which was added some paint.  I happened to have some tubes of acylic paint lying around but anything water-based works fine.   I also added a little bit of white PVA glue to help it clump together.
And here's one I prepared earlier
Once mixed, the foliage was spread out over some tin foil on a tray to dry.  This can take quite a long time and in my case took about three days.  However, it turned out really well and I was very pleased with the result.  So I made some more with the 4 + 2 sponges I had left, producing some different shades of green this time.
Any colour you like as long as it's green
I reckon that all in all it cost me about £1.20 of materials, and a little time, to make £20 worth of clump foliage.  Well worth it.

Monday, 20 June 2016

Affordable Housing

The last wargame we had a few weeks ago was a brief 1/300 scale WW2 encounter on the western front.  Sadly it didn't work out too well and as my phone was full I couldn't take any photos anyway, so there is no AAR.
Back gardens - 1/300 BTR70 for scale
However, one thing that did come out of it was the realisation that we had a lack of suitable 1/300 buildings in our collection, so I've done something about it in that I've spent the last few weeks making some 20th century structures suitable for western Europe.
Of course when I embark on such projects I never do things by half and so my plan was to make a dozen buildings or thereabouts.
My materials of choice are (nearly) always cardboard and the thin polystyrene sheets that come with some brands of supermarket pizza (poor man's foam-board as I call it).  Everything was glued together with Evo-stick wood glue (normal PVA), which, if you make simple structures, can be remarkably sturdy.
For the factory shed roof I had some nice cardboard with narrow corrugations that had come from some sort of fancily bound document in my collection (Historic Scotland's Annual Accounts I think).
Inspiration came from various sources including my PC game of choice ARMA3.  Here is the model I made based on the building shown below.  In my mind's eye it is a perfect match with regard to the original.  What?  No?  Just me then...
I also made a couple of Ardennes style stone farm buildings (based on another WW2 PC game/mod called Darkest Hour).
So overall quite fun to do and, as I painted all the roofs red, a good match for other buildings I'd made previously (see the DBR AAR from a few months ago).

Friday, 11 September 2015

Home Made Sea

Being a) quite keen on naval wargaming and b) a bit of a cheapskate, I've been admiring the excellent sea mats made by Terrainmat, but thought I could maybe make one myself.  So I have.
Otranto
My inspiration came from the tutorial for terrain mats on Tobi's Paint Pot blog.  Here's what I started with.
Basically, I used a decorator's dust sheet from Amazon and some tubes of acrylic sealant from B&Q.  I didn't use the whole sheet but cut it in half to end up with a panel about 200cm by 140cm.  Here is the section with a 1:3000 scale Navwar warship (HMS Inflexible) on it for reference.
I made a spreader from some hardboard with the intention of getting the acrylic as thin as possible, but with some 'wave' textures on it.  I used one of those 'sealant guns' that look like a stripped down Sten gun (and probably just as accurate) to dispense the acrylic.
Once the acrylic had dried (I'd left this for about 12 months between application and painting: it doesn't need that long, a couple of hours should do it, but it just turned out that way) I painted it with some gloss blue paint.  I ended up using expensive Hammerite Garage Paint because I couldn't find any gloss paint I thought was right.  Although this was the desired colour for me ("Oxford Blue") it was a bit of a pain because it took over four hours to dry (and needed white spirit to clean the brush).
Anyway, once it was ready I dry-brushed the sheet with some white emulsion.  If I'd been more patient I would have eradicated all fold lines before I'd started to put the acrylic on (using an iron?), but the whole thing was a sort of experiment anyway, so I'll know what to do next time.  And here are some posed shots of it in action.
These are Navwar WW1 battlecruisers HMS Inflexible & Inflexible with light cruiser HMS Glasgow on the move (somewhere in the vicinity of the Falklands, no doubt).
SMS Scharnhorst and Gneisenau, with Leipzig and Nurnberg in the background.  For my ship bases I'd dry-brushed on some sea-green to tone down the blue before adding the white highlights.  I was too lazy to do that for the sheet (also I didn't have enough of the right green anyway) but may revisit it at some point if I think it is necessary.
And here is the Emden, posing by one sinking freighter and about to go after another.  Anyway, hopefully we will be seeing more of my new sea terrain and even these models in action before long.

Saturday, 2 May 2015

A Tale of Two Bridges

Pondering the scenario we were going to use for our next game I realised that, regretably, I appeared to be short a bridge (or two).  I'd already made various river sections and an 'ancient' DMB style bridge, but needed something a bit more modern.  It's all relative.
My first thought was that were going to have an ACW game so I clearly needed a wooden bridge for that.  I made it about 45mm wide in order to accommodate our ACW plastics and in fact most of our other standard WRG basing (i.e. DBM/DBA/DBR).
Construction materials comprised matches stuck on to pieces of cardboard with standard PVA glue, a section of lino for the river and various offcuts of thin card and polystyrene.
Once all glued together, the bridge was thickly undercoated in black acrylic and then drybrushed heavily with dark earth (Revell 82), followed by a lighter dry brushing with Africa brown (Revell 17).  The river banks were painted Africa brown and then coarse shelly sand was added (using PVA), followed by some static grass.

Of course after I'd made this one it was decided that the scenario would instead be a Napoleonic one played out using 20mm plastics and therefore the bridge I'd just made would be too narrow.  So I also made this one which is about 65mm wide.
This was basically the same construction as the matchstick bridge but used wooden lolly-pop sticks instead.  The same painting technique was used which brought out the grain quite well and makes them look like oak planks or something.
Cutting off the rounded ends of the sticks with a pair of stout scissors made the ends a bit uneven with the odd chip-out, which gives it all a bit more character.  I'll describe the AAR featuring this latter bridge in my next post.

Saturday, 28 March 2015

Campaigns and Earthworks

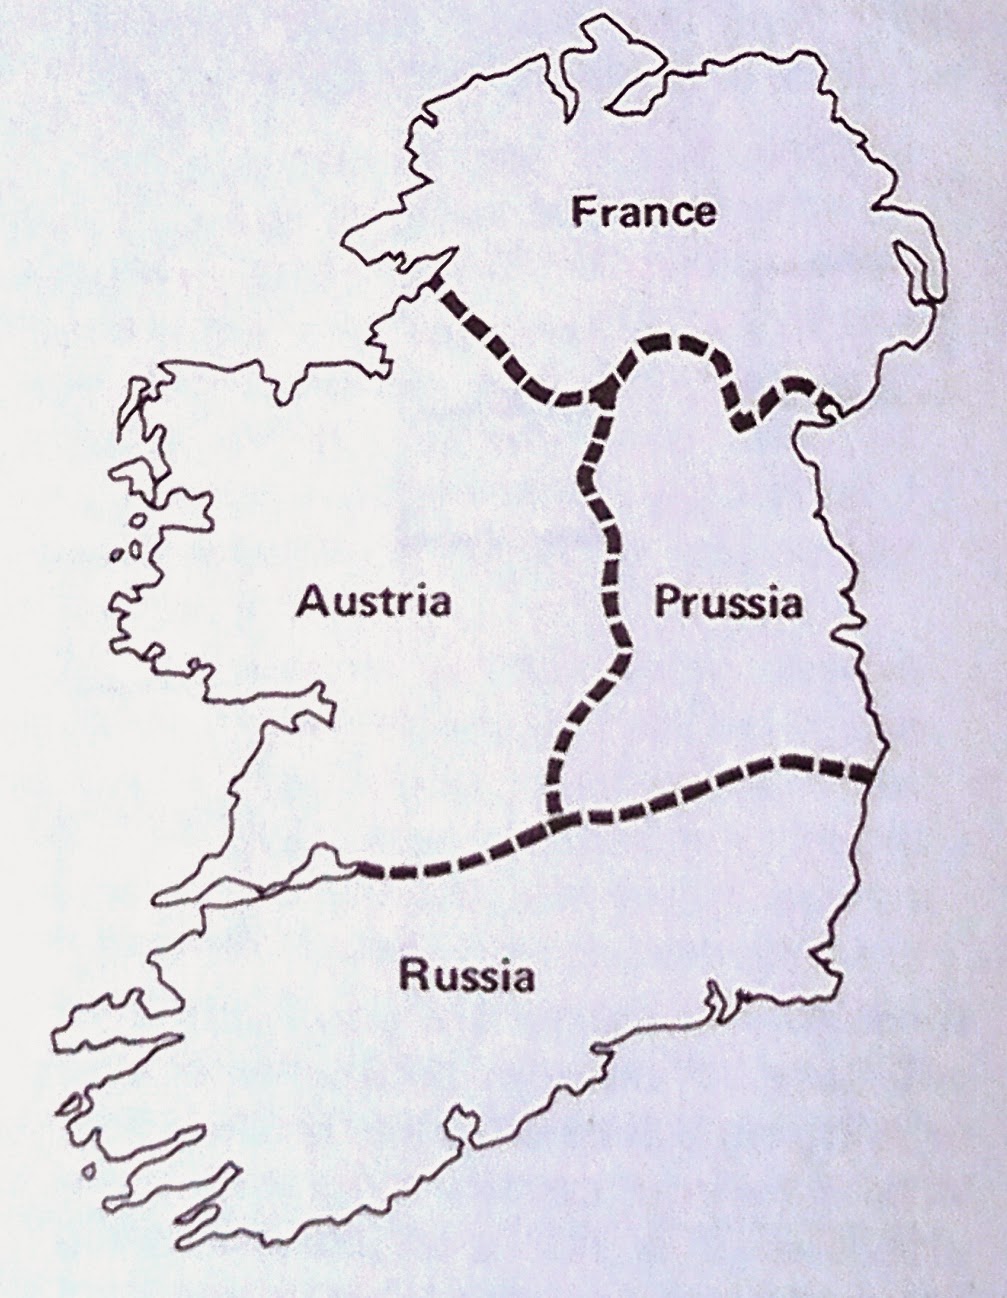
Wargame campaigns are funny things and we've tried a few over the years (and more are planned).  One of the first large scale campaigns we did used a somewhat truncated map of Ireland, over which we fought a bloody ACW campaign.
"Say cheese"
We decided to use Ireland as the basis for the map because a) Bruce Quarrie had suggested it in the Airfix Magazine Guide No. 4 "Napoleonic Wargaming" and b) we happened to have a map of Ireland.
Campaign Map from Airfix Magazine Guide No. 4
Not having access to a Xerox machine (this is quite some time ago) our map was made by (Geoff) tracing the master map and adapting it somewhat.
Hand drawn map of Ireland, somewhat adapted
Map movement was conducted using the classic matchbox chest of drawers method and battles were fought using the old Circa 1863 rules, which produced a gruelling, yet I think accurate, outcome.  Anyway, what has this got to do with earthworks?
Cautious Confederate attack on Federal positions
Well, one of the battles involved an attack by superior Confederate forces on a Union held village (Ballina).  It was judged that the Federals would have had time to throw up some defences and therefore it was necessary for me to make some earthworks.

Since then, these have lain in a box (only getting the occasional outing) but it was always my intention to fill in a few gaps and refurbish what I had already made, so this is what I did last week.
Stage 1: glue polystyrene to cardboard
Raw materials comprised strips of polystyrene pizza packaging (i.e poor man's foamboard), cardboard, matches, polyfiller, fine sand and PVA glue.  The polystyrene (suitably scored to allow it to key) was used to create the overall profile and then this was covered in filler.
Stage 2: profile with filler and attach matches
Once all this had dried out thoroughly I spread PVA glue thinly over the front slopes and added fine sand to give it some texture as the filler I had was too smooth (it was what I had to hand at the time). 
Stage 3: sit back, take out your pipe, and admire your handiwork
Everything was then undercoated in matt black and the earth slopes painted in a reddish brown colour (I used Tamiya XF-79 Linoleum Deck Brown) in order to match the pieces I already had.  The woodwork was painted with Revell Acrylic Dark Earth (82) and everything was dry-brushed with a sand colour.  And here they are lined up on the kitchen table with some Airfix soldiers manning them, veterans from the original battle.
A selection of what's in the box now
I was particularly pleased with the gun emplacements which featured in the battle mentioned above.
Suspiciously empty gun emplacement
You will notice that the emplacement I've shown is empty.  This is because, although the Federals had had time to prepare defences, they did not happen to have any artillery.

This was not known to the Rebels who approached very cautiously, only to find that the guns pointing at them, apparently fiendishly waiting until they got to cannister range, were merely tree trunks shaped and painted to look like guns.  Quaker guns.  Well, I laughed: but then I did say that campaigns could be funny things.