Showing posts with label ACW. Show all posts

Friday, 23 August 2019

ACW Adventures in Basing No. 9

A very long time ago (2012 to be exact), I did a post featuring a box and some unpainted sprues of 1:72 Italeri ACW Union Cavalry, promising to get on with them ASAP.  The good news is that I have now finally finished and based them.
These are very nice figures and being a slightly stiffer type of plastic hold the paint very well.  It doesn't come out clearly in the photos but I painted these using a two stage tone system, i.e. after a thorough black undercoating I did the base coat colours (mainly from an old but trusty pot of Revell 5077 blue - which I use for painting Napoleonic French as well) and then some highlights with a slightly lighter blue.  It's the same system as I use for 15mm figures.
Faces were done using a 'rust' coloured base (Revell 37 Reddish Brown) and then flesh colour daubed in four places: on the cheeks, nose and chin.
Horses were initially painted in various shades of brown (e.g. Revell 85 Braun, and some in darker browns).  Thin black wash was then applied to each horse's face, manes, tail, legs and underparts in layers generally to build up the contrast and create variation across the animal.  Tackle was painted black afterwards.
Finally, I needed to upgrade my generals, which are very old plastic Spencer Smith figures (technically 40mm I think).  I stripped these down from their flat mid 1980s' paint job and removed the mould lines properly this time.  After painting, all figures were varnished using Windsor & Newton "Galeria" acrylic matt varnish, as recommended by a couple of people on the TMP forums.
Basing was my usually coarse shelly sand on MDF bases, with added static grass.  For some reason I never painted the sand on earlier ACW figures I'd based, so I kept with tradition on these ones.

So, remarkably, that's pretty much all of my ACW figures painted.  The only thing I might need is some dismounted replacements for the cavalry, but they feature so rarely in our games (when we have ACW games) that they're not even on my list of things to do.

Sunday, 30 September 2018

Nice Bit of Planking

I've been making buildings again.  The idea was to construct some more structures for my 15mm AK47 Project, which I previously started by making a tembe and then a walled compound.
In this case I thought I'd draw on my observations of the types of buildings I'd seen in Gabon, when I was there on a project a few years ago.  In case you don't know, Gabon sort of sits in what I would describe as the armpit (or oxter, as we say in Scotland) of west Africa, south of Cameroon and Equatorial Guinea and north and west of the Republic of Congo (and beyond that, the Democratic Republic of Congo (DRC)).  Sweaty and humid it certainly is.
As with much of west Africa it is (or was) covered in forest and therefore wooden buildings are common; and because of the size of the trees the planks used can be very wide indeed.  In fact it was interesting being there to see felled trees with only the central trunk cut into planks and the rest of the tree just left there, presumably because it wasn't worth cutting up the rest of it.
Therefore, as wide planks are utilised in the real buildings, I realised that even at 15mm scale I could make use of those wooden stirring sticks I'm always collecting from coffee shops when getting my regular latte.
Construction was therefore bits of wooden stirring sticks cut to length using a pair of small pliers, with matches used to form the supports inside.  Normal wood glue (PVA) works great to stick everything together on a cardboard base.
Once dry, rough shelly sand was glued to the base and the building was undercoated inside and out in black paint (I have a tester pot of black emulsion I use for that).  The planking was then heavily dry-brushed with Dark Earth (Revell 82) and then lightly dry brushed with Afrika Braun (Revell 17).  Thin washes of black were applied to the lower walls and to emphasise shadows.
Although I'd intended these buildings for AK47, I did make them a slightly large 15mm scale because I do have a lot of 20mm figures in other periods.  I had also thought to make them modern African buildings by adding posters and things like corrugated iron but realised that by leaving them plain I could use them for 20mm ACW set-ups as well.
However, the other buildings I am making will be specifically for AK47 and this last one is aimed at that.  In this case it has some pieces of corrugated iron attached to it, made from corrugated cardboard with a narrow ridge spacing, that once covered, I believe, a set of annual accounts from Historic Scotland.
In addition, I made the roof look like it was made of thatching grass using the bristles cut from an old floor brush, these being natural fibres rather than nylon or something like that.  Painting was the same all over, except I treated the corrugated iron with a rust colour, followed by patchy colour (pale blue & off-white) and then some dry brushing to bring out the highlights.

Monday, 17 April 2017

Another Barn Conversion

My previous post was about making a (15-20mm scale) covered structure to go over a bridge I'd constructed even earlier.  However, looking for a small project in between my various trips this year I decided to use the 'barn' for another purpose.
In this case I made a base for it so that the 'barn' could be used as a free-standing structure.  The base includes internal walls and doors at either end.  The objective was to make a ruined substructure that would be revealed when the barn was supposed to be damaged due to shell fire or arson (or inclement weather?) during a game, a suggestion taken from various old-time wargame books.
As you can see, removing the barn would therefore reveal the remains of the ruined barn beneath it, but with enough space and absence of clutter to place troops as necessary.
Construction used the usual mixture of matches, wooden stirring sticks and cardboard.  The sub-structure was designed so that the barn would be held securely in place until it had to be removed.

After putting it together, everything was undercoated in black and then heavily dry-brushed in dark earth, with sand highlights and various coats of thin black wash for shadows and emphasis.

Friday, 10 March 2017

Barn Conversion

Wargaming is a life-long hobby (at least in my case) and there are often things that we've planned to do at some point but have never managed to get around to, until much later.
I am as guilty of that as anyone.  However, the good news is that I have recently managed to complete one of those little projects that was first jotted down some considerable time ago.  In 1987 to be exact.
This is a sketch I made in my wargame journal when I was still at university and we were in the middle of an ACW campaign, partially conducted by mail (the old fashioned kind with envelopes and stamps and things like that).  It was my idea for a covered bridge, or barn bridge as I referred to it.
After making some wooden bridges as recently as 2015, I realised I could use one of them as the basis of my long-planned barn bridge.  Construction (in approximately 20mm scale) comprised a basic internal sheet-polystyrene structure with cardboard roof and walls.  To the walls I glued matches and on the roof I put cut sections of those wooden stirrers you get in coffee shops these days (presumably because the public can't be trusted with teaspoons).
Once the glue was dry, everything was undercoated in black and then liberally dry-brushed in Revell Dark Earth.  Highlights were added with a rapid dry-brushing of Revell Afrikabraun (sand colour).  After that was done I finished off with few coats of thin black wash in selected places to intensify edge contrasts and shadows.
As you can see I made the 'barn' section so that it would fit neatly over the bridge I had made previously, so I now have two bridges for the price of one.  It's only taken me thirty years but some things with a long gestation period are worth waiting for.

Saturday, 25 February 2017

ACW Positional Defence (2)

This is the after action report (AAR) from an American Civil War (ACW) wargame we played near the end of 2016 before various business trips, Christmas and so on intervened (hence the long gap since I last posted here).
The aim was to playtest the Principles of War 2nd edition rules (POW2) I'd had on the shelf for about 10 years.  From reading through the rules I liked their apparent simplicity as well as the interesting command and control mechanism, so I wanted to see how they would play out under stress of battle.  I'd also wanted to find an alternative to Neil Thomas' nineteenth century rules we'd tried earlier in the year which we found too simple.
Positional Defence (2).  Confederate attack.
Alert readers will know that this scenario comes from Charles S Grant's excellent book "Scenarios for Wargames", which we have used a few times in recent years. In fact the first AAR I ever posted on this blog was Positional Defence (1), which coincidentally was also an ACW game.  In the intervening years all of our ACW figures have been rebased (as recounted in detail elsewhere on this blog).  As you will see these are the classic 20mm Airfix figures that we've had for nearly forty years, and still going strong.
Union starting positions
The scenario has the "Red Force", in this case the Confederates, attacking a smaller Union force in a defensive position on high ground with a village at the centre. The forces were adapted from the scenario in the book so the Confederates had seven infantry regiments and three guns, with the Union side having four regiments and two guns.  As you can see from the map, the Union forces were spread thinly with one regiment and gun on each hill, one in the village and one regiment out of sight in reserve behind the village.
Confederate attack on left flank develops
The Confederate plan was quite simple: to wear down the defenders with artillery fire whilst the infantry advanced on both flanks across the open ground towards the objectives.  Initial bombardment was on the infantry in the village, which despite being in hard cover, were rapidly forced out of the houses by incessant artillery fire (and rubbish die throwing).  This allowed the rebels to move forward quickly with few casualties.
Confederate attack on Union right
The lack of effective defence in the centre meant that the rebels could bring up their guns and after a short exchange the Union regiment on the right-hand hill started to withdraw.
Right flank falling back, artillery about to be destroyed
Furthermore, despite some spirited firing, the artillery on the right was worn down rapidly and destroyed, leaving the right flank practically open.
Union forces pushed off hill on the right with reserves trying to move up
Meanwhile, on the left, the rebels were using the woods as cover and were moving up rapidly.
Situation on the left
The battery on the left was mainly engaged in long range counter battery fire but was quickly weakened.
Rebels in the woods
The rebels continued to push hard on the left and the incessant bombardment meant that the Union's last remaining battery's strength was reduced to zero.
Not looking good for the Union
The rebels then moved into the contact against the isolated Union regiment on the left whilst the Confederates climbed the hill on the right.
Confederates capture hill on right, attack hill on left
On the left the sole remaining Union regiment was attacked frontally whilst another rebel regiment contacted it in the flank.
Union regiment outnumbered
However, the Union regiment was able to defeat the rebels to the front and then turn its attention to the flanking force.
Rebels run away.  Right, who's next?
Union regiment combats flanking force
Amazingly the flanking rebel regiment was also repulsed.
Ha!  Take that!
Unfortunately this success was only temporary as the rebels in the woods moved up and attacked again.
Persistent Rebels
However, by now it was all over for the Union as the Confederates controlled the right hand hill and the scenario's main objective, the village.
Rebels to the right of me, Confederates on the left... here I am...
So at that point we called it a day.  The Union side was comprehensively beaten and it appeared that very little could be done to stop the Confederates advancing to contact, sweeping the weaker Union forces away.

As with all of CS Grant's ideas, the scenario was pretty good but perhaps the forces could have been slightly better balanced to make more of a fight of it, although that might have been more to do with how we chose forces rather than the scenario itself.

As for the POW2 rules they worked fine and were easy to follow.  Unlike some sets of rules they don't bother with a lot of 'fluff' but get straight to the point in a structured way, even laying out the rules in the same order as the move sequence, which some well known sets of rules don't seem to bother with.

However, there was something slightly 'flat' about them and I certainly felt that the rules did not give the defenders the expected tactical advantages from cover or elevation that would enable them to even slow the enemy, let alone stop them as they advanced inexorably in the open to contact.

That said the POW2 rules certainly performed better than the very simple nineteenth century Neil Thomas rules so I haven't given up on them just yet.

Saturday, 2 May 2015

A Tale of Two Bridges

Pondering the scenario we were going to use for our next game I realised that, regretably, I appeared to be short a bridge (or two).  I'd already made various river sections and an 'ancient' DMB style bridge, but needed something a bit more modern.  It's all relative.
My first thought was that were going to have an ACW game so I clearly needed a wooden bridge for that.  I made it about 45mm wide in order to accommodate our ACW plastics and in fact most of our other standard WRG basing (i.e. DBM/DBA/DBR).
Construction materials comprised matches stuck on to pieces of cardboard with standard PVA glue, a section of lino for the river and various offcuts of thin card and polystyrene.
Once all glued together, the bridge was thickly undercoated in black acrylic and then drybrushed heavily with dark earth (Revell 82), followed by a lighter dry brushing with Africa brown (Revell 17).  The river banks were painted Africa brown and then coarse shelly sand was added (using PVA), followed by some static grass.

Of course after I'd made this one it was decided that the scenario would instead be a Napoleonic one played out using 20mm plastics and therefore the bridge I'd just made would be too narrow.  So I also made this one which is about 65mm wide.
This was basically the same construction as the matchstick bridge but used wooden lolly-pop sticks instead.  The same painting technique was used which brought out the grain quite well and makes them look like oak planks or something.
Cutting off the rounded ends of the sticks with a pair of stout scissors made the ends a bit uneven with the odd chip-out, which gives it all a bit more character.  I'll describe the AAR featuring this latter bridge in my next post.

Saturday, 28 March 2015

Campaigns and Earthworks

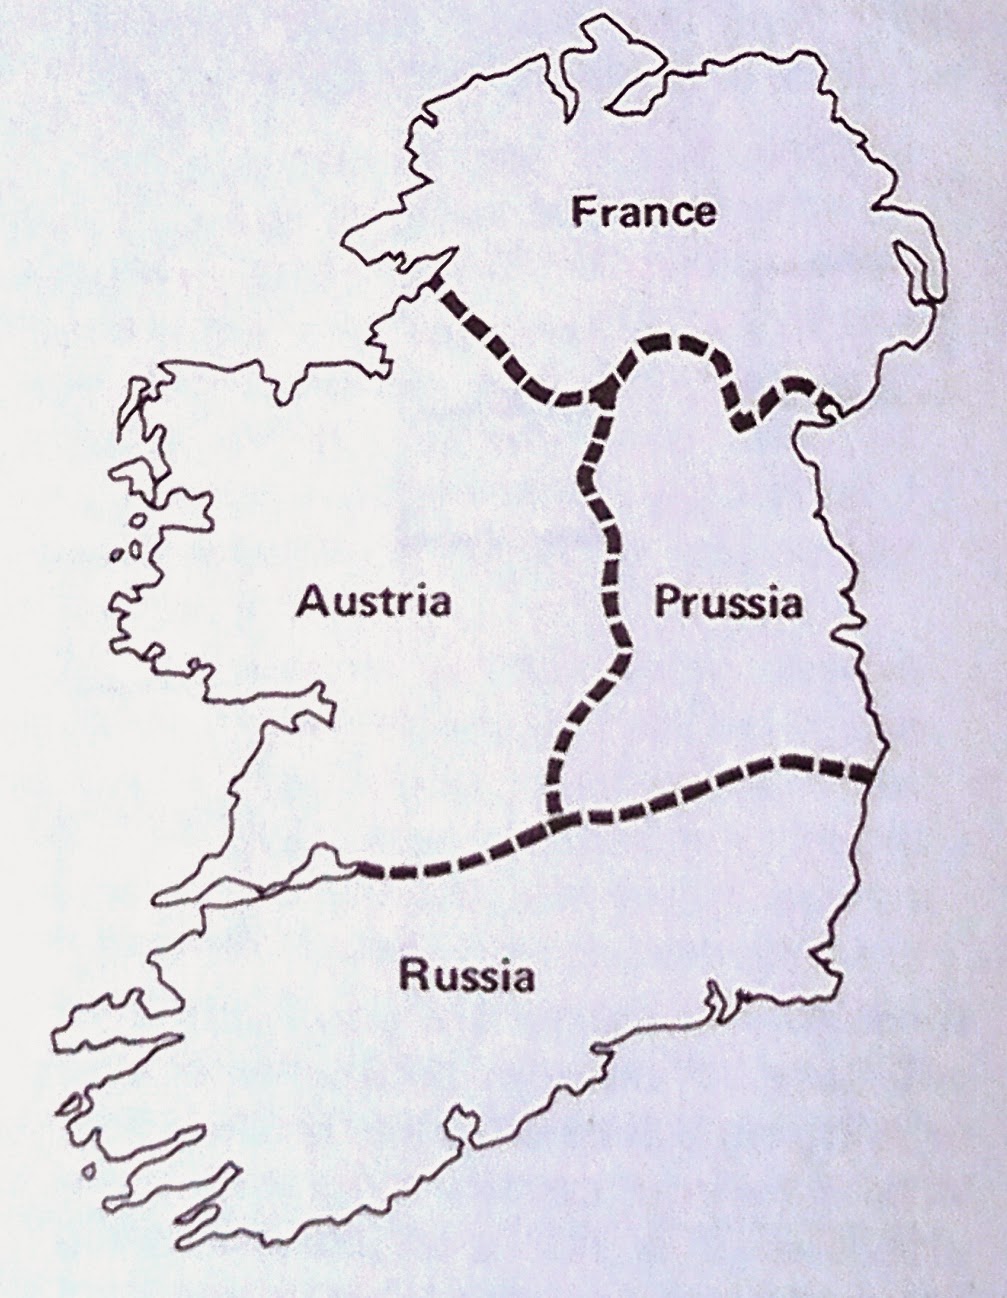
Wargame campaigns are funny things and we've tried a few over the years (and more are planned).  One of the first large scale campaigns we did used a somewhat truncated map of Ireland, over which we fought a bloody ACW campaign.
"Say cheese"
We decided to use Ireland as the basis for the map because a) Bruce Quarrie had suggested it in the Airfix Magazine Guide No. 4 "Napoleonic Wargaming" and b) we happened to have a map of Ireland.
Campaign Map from Airfix Magazine Guide No. 4
Not having access to a Xerox machine (this is quite some time ago) our map was made by (Geoff) tracing the master map and adapting it somewhat.
Hand drawn map of Ireland, somewhat adapted
Map movement was conducted using the classic matchbox chest of drawers method and battles were fought using the old Circa 1863 rules, which produced a gruelling, yet I think accurate, outcome.  Anyway, what has this got to do with earthworks?
Cautious Confederate attack on Federal positions
Well, one of the battles involved an attack by superior Confederate forces on a Union held village (Ballina).  It was judged that the Federals would have had time to throw up some defences and therefore it was necessary for me to make some earthworks.

Since then, these have lain in a box (only getting the occasional outing) but it was always my intention to fill in a few gaps and refurbish what I had already made, so this is what I did last week.
Stage 1: glue polystyrene to cardboard
Raw materials comprised strips of polystyrene pizza packaging (i.e poor man's foamboard), cardboard, matches, polyfiller, fine sand and PVA glue.  The polystyrene (suitably scored to allow it to key) was used to create the overall profile and then this was covered in filler.
Stage 2: profile with filler and attach matches
Once all this had dried out thoroughly I spread PVA glue thinly over the front slopes and added fine sand to give it some texture as the filler I had was too smooth (it was what I had to hand at the time). 
Stage 3: sit back, take out your pipe, and admire your handiwork
Everything was then undercoated in matt black and the earth slopes painted in a reddish brown colour (I used Tamiya XF-79 Linoleum Deck Brown) in order to match the pieces I already had.  The woodwork was painted with Revell Acrylic Dark Earth (82) and everything was dry-brushed with a sand colour.  And here they are lined up on the kitchen table with some Airfix soldiers manning them, veterans from the original battle.
A selection of what's in the box now
I was particularly pleased with the gun emplacements which featured in the battle mentioned above.
Suspiciously empty gun emplacement
You will notice that the emplacement I've shown is empty.  This is because, although the Federals had had time to prepare defences, they did not happen to have any artillery.

This was not known to the Rebels who approached very cautiously, only to find that the guns pointing at them, apparently fiendishly waiting until they got to cannister range, were merely tree trunks shaped and painted to look like guns.  Quaker guns.  Well, I laughed: but then I did say that campaigns could be funny things.