Showing posts with label Building. Show all posts

Saturday, 30 May 2026

Progressive Republic

I started this blog back in 2011 whilst sitting in our rented apartment in Jamestown, on the South Atlantic island of St Helena, looking out the window at the house opposite that the future Duke of Wellington once stayed in.  As I was far away from all of my wargaming stuff I wrote down some lists of things I was going to do when I got back to Scotland a few months later, this being one of them.

Unfinished 15mm model building for AK47 Republic
Work in progress

As that post says, I had recently (i.e. in 2010) bought some Peter Pig AK47 Republic armies on eBay but had never done anything with them.  Fast forward to 2026, when that is still the case, but at least there has been progress.

For one thing I've actually been sorting out the figures I have and have been organising, refurbishing and rebasing them.  It turned out I had everything required for opposing Dictatorship (that's him on the roof there) and Colonial Powers/Settler armies, the former provided with armour in the shape of T-55s and the latter Centurions.

Peter Pig 15mm religious leader, extra militia and AA guns

There were also a large number of shirtless militia (I don't think PP makes those any more?) that I realised could be a Religious Movement army, although they lacked a suitably inspiring leader and any hardware.  This was rectified this week when my order from Peter Pig promptly arrived.

Peter Pig 15mm technicals and a Ural truck

As well as the new leader, the militia and some AA guns, I ordered some Toyota technicals, something that I had always wanted to have.  I mean if you're going to play AK47 you have to have technicals.  I also got the Ural truck, not because I needed one, but because I like them.

The Wishful Wargamer admiring a Ural fire tender

[The photo is from western Uzbekistan (Karakalpakstan, technically) near the (former) Aral Sea where I had a long-running project].

Anyway, once the armies are done I will post about them as well as any games I manage.  As noted, the rules I have are the original AK47 Republic (a genuine plastic comb-bound hard copy with all the supplements that I bought new from PP back in 2010), which are still highly regarded. 

Building attributed to Dave O'Brien, from the AK47 Ztum Setum blog

I will also be adding to the collection of AK47-adjacent buildings I have been making for the last 10 years or so (see other AK47 posts here).  These will probably be more urban examples such as those shown on the AK47 Ztum Setum website (see direct copy in progress) as well as some of the excellent buildings being fought through in Irish-Serb's Mugabia-Uwanda war series of posts, that aren't strictly AK47 but do have the same setting.

Saturday, 23 May 2026

An English Church

I am the keeper of two 6mm (Heroics & Ros) English Civil War armies based for the WRG's DBR rules that have been sitting in a shoebox since their last outing more than 10 years ago.  The fact is though, all of my wargame projects are long term projects which means the urge to tick something off some list or other I made decades ago (I make lists constantly) resurfaces now and then.

Hilltop church in 6mm

Anyway, an item on my to-do list was to make a medieval church suitable for the period.  Something small but typical was what I had in mind.  So, after a bit of searching on the internet I found this example, the Honeychurch Church of St Mary in Devon.

Honeychurch Church of St Mary
The name derives from the Anglo-Saxon "Huna's Church" and it was built around 1150AD.  It is one of the few Norman churches remaining that have been relatively unaltered since built (particularly by those interfering Victorians).

View from the South-West
For my 2026AD version, construction was from the usual polystyrene offcuts and cardboard stuck together with wood glue (PVA).  Painting involved undercoating in black then dry-brushing in grey and ochre with some dark wash added to create a bit of depth.  Details added include an area of churchyard on a separate bit of cardboard as well as some 'stone', walls made from polystyrene strips mounted on coffee stirrers. 

Coat of Arms of Charles II
Obviously it wasn't possible to make anything to go inside the church but it was interesting to find out that the real church has various paintings inside, including this one depicting the coat of arms of Charles II (noting as usual that Scotland's unicorn is chained so that it can't get away).
View from South-East
Anyway, having exhausted my list of Civil War related items to make I should now be ready to get the roundheads and cavaliers out for a game, unless I can find (or add) something on the list to put off that fateful day...

Tuesday, 14 October 2025

Walls in Ruins

Further to my earlier post about some 15mm ancient city walls and buildings I'd made, I thought some evidence of violent siege would be in order.  So I made these.

Mind the gap
The idea was to have damaged sections that would match lengths of unbroken wall, so that these could be substituted in as necessary.

Rear view
The centre bit of wooden wall could also be removed to leave a gaping hole, if that was needed.

Something appears to be missing
The walls were made from cardboard and polystyrene fixed together with PVA glue.  Fine sand was then glued to the walls and painted.  The piles of masonry were made from polystyrene offcuts and were intended to hold the wooden wall in place.

Time to get the decorators in
Liberated wooden coffee stirrers were used to make the planking, undercoated in black then painted with a dark earth colour.  A couple of black washes were applied and then the wood was drybrushed with a beige or buff colour.

What, no crenellations?
Overall, I think they've worked quite well.  Just need a siege to try them out...

To be honest, the damage is barely noticable


Saturday, 12 October 2024

The Walled City

Before our pocket money increased to the level where we could buy such wonderous things as those plastic Airfix forts that aren't available anymore, we used to make our own battlements on which we would line up our soldiers. In those days, my dad had a preference for Van Heusen shirts and at that time these came in cardboard boxes, usually with an illustration on the front.

I have a very clear memory of cutting out the drawing of a castle from one of those boxes and then using the rest of it to make the other walls, flimsy battlements and the wobbly walkways between them, all held together with sticky-tape.  It used to take ages to put the soldiers up there (Airfix Ancient Britons, French Foreign Legion and Guards Colour Party mainly) and only one well-placed hit by a nail fired from a Britains 25 pdr gun to knock them all off again.  Those were the days.

Scratch-built 15mm scale ancient town walls
Some battlements, yesterday

However, since then there have been some slight improvements.  For one of our early DBM campaigns (my 15mm Lydians vs Geoff's Persians) I made some simple city walls for my troops to man.  Actually that battle was an exercise in my troops trying to get off the table as quickly as possible as I was outnumbered three to one, not to mention being attacked from two directions at once (those pesky Persians).

Scratch-built 15mm scale ancient town with walls
I remember when this was all fields (of fire)
Subsequently the extent of walls expanded and so did the various buildings I've made to put inside them.  The construction of all walls and buildings uses thin polystyrene sheets and cardboard, coated in fine sand then painted with a mixture of household emulsion and various acrylics.  The buildings are generic enough to also be used for locations such as Mexico (e.g. Mexican Revolution) or arid Africa (e.g. AK47).  They are simple to put together and I keep adding to the pile when I feel like making something (regularly).

Scratch-built 15mm scale ancient town walls with Hebrews
Early Hebrews man the walls
Just to add that the figures in these photos are 15mm Chariot miniatures sold by Magister Militum, comprising a DBA 3e Early Hebrew army (that's I/34c for those of you paying attention at the back).

Tuesday, 11 July 2023

Airfix Gun Emplacement

This is a post about the famous Airfix Gun Emplacement, or at least what's left of the one I had many years ago.
Airfix Gun Emplacement

Actually, there isn't much left at all, just the two bunkers, with the base and match-firing gun long gone.  Furthermore, the octagonal bunker was at some point converted into a pillbox by cutting some rough holes in the sides, but this was never very satisfactory.  Consquently I thought it was time for an upgrade.  And here it is.
Gun Emplacement Bunker conversion

For this small project I decided to have the pillbox sitting in a base, which is made of a couple of layers of polystyrene foam.  Once shaped, the base was covered in rough sand, painted in earth tones and textured with flock, adding cloves from the kitchen spice-rack cut down to look like tree stumps.

Airfix gun emplacement pillbox conversion
In addition, I constructed some 'concrete' walls around the entrance, textured to look as though wooden shuttering had been used to form them; a technique I believe the brutalist French architect Corbusier was very fond of, as were the German occupiers.  In my case, this effect was done by gluing wooden coffee stirrers to a thin foam core and then painting them to look like concrete to match the repainted pillbox.
Airfix gun emplacement pillbox conversion
The pillbox actually lifts off so figures can be put inside.  Furthermore, considering the gun emplacment set is not being made any more (at least at the time of writing), I may yet construct my own scratch-built version of the entire model, built around this remaining element.

Sunday, 14 June 2020

Barns

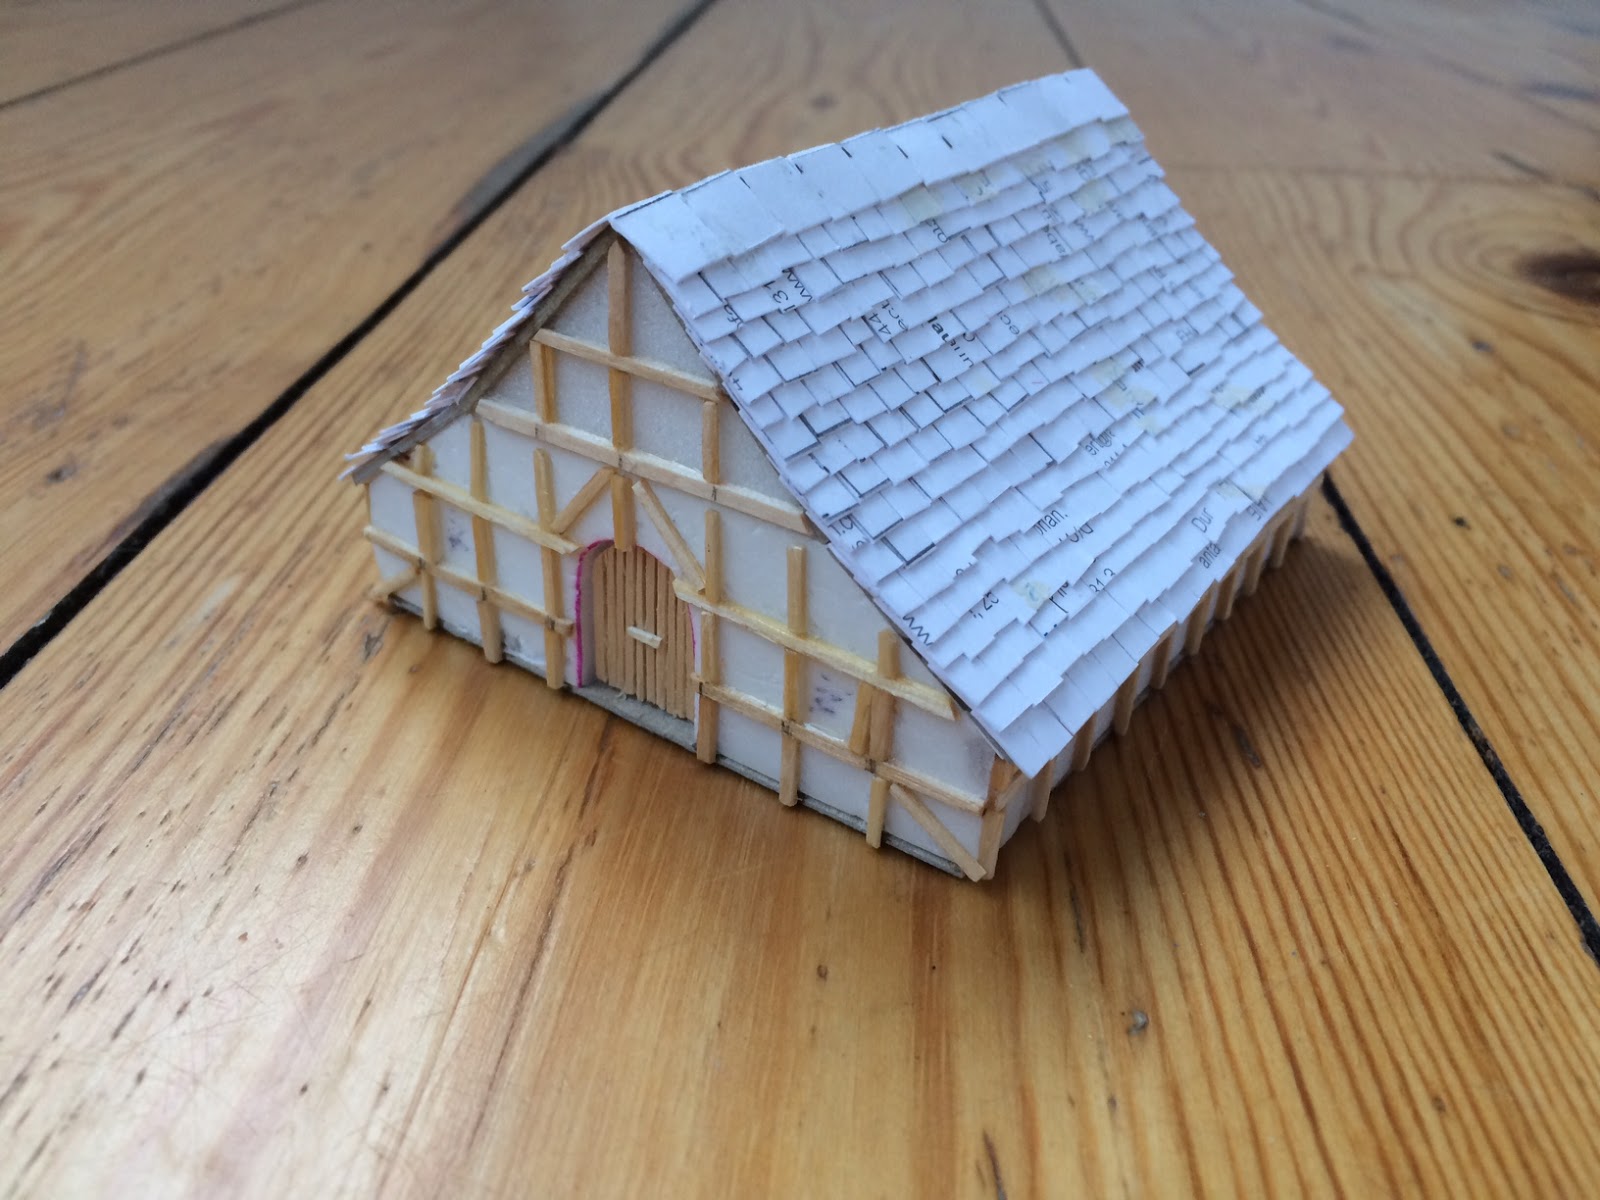
Yep, making buildings again.  This time I thought I'd like to make a European sort of barn to go with the other 15mm half timbered buildings I'd made earlier.
So this is it, loosely based on a type of north german low barn, for example this one, except in my case I dispensed with the brick finish and more complicated roof structure and went for the painted half-timbered look instead.
Construction was the same as previously, with polystyrene walls and sliced up coffee stirrers for the woodwork.
The individually cut (from old business cards) and placed roof tiles did take a while though.  As with many of my wargame buildings the roof lifts off so that troops can be put inside, but it's quite neatly done (I think) so it's hard to see the join.

And of course, why make one barn when you can make two.  So I did this one as well in a different style.
I was inspired to make this based on an article by Tony Harwood in Minature Wargames magazine which I subscribed to for a year basically because there was an offer on (some interesting articles but overall too much fantasy, sci-fi and product placement for my liking).
Using this design as my starting point I bascially made this building the way I normally make them, with ploystyrene sheet walls, which were then PVA'd, coated in fine sand and painted. The fish-scale type roof tiles were actually quite straightfoward to do and with a bit of careful measurement they all matched up quite well.  I think I could make a couple of other buildings now with this roofing technique.
A nice detail was the small openings at the gable ends and I kept these in my version.  And in this case you can see the line where the roof lifts off to put figures inside.  Hopefully, with the intention to have a bit more terrain on the table, these should get an outing by the next time we get a game (Covid-19 situation permitting).

Monday, 9 March 2020

Building Again

Just a post to indicate that I've not been completely idle over the last few weeks since I last put something on the blog.  As is usually the case, when I've needed a break from painting figures (and actually getting some games in), I've been making things.
One of Geoff's - I just added the roof
In this case a brace of 15mm-ish European buildings that could be used for any period.
BUA?
They're not quite all done yet but they started off like this - polystyrene sheet walls glued onto a piece of cardboard.  The next stage was to separate them and add the wall timbers made from sliced up coffee stirrers just fixed onto the walls with PVA glue. 
That's wood that is.
As I had time the (removable) roofs were made from thin card cut up into individual tiles and then glued in rows onto the underlying cardboard structure.  Quite time consuming but worth it.
Spot the difference?
And this is how they looked when painted up and based; and since I photographed these I've added leading to the windows with a Sharpie (attention to detail is everything, even if no-one else notices). Now just to get on with all the other things I've been planning...

Thursday, 2 January 2020

Building for the Future

Happy New Year everyone.  And now I've got the pleasantries over with I can confirm exclusively that I'll be looking forward/backward with "2020 Vision" this year.  Right, where did I put my glasses...
On patrol with a BTR70 (QRF)
Anyway, continuing on from a previous blog post from (wait, what?) last January, here are a couple of new 15mm-ish buildings for Africa/AK47 which I made in the same sort of style.  As I mentioned in the earlier post, I've been to various places in Africa with work and in rural west Africa houses are usually made of wood. 
The planks used are very wide generally because the trees are big and there are (or were) plenty of them.  Consequently, wooden coffee stirrers that can be pilfered widely here are just the right scale to make these sorts of buildings.
In this case I wanted to make a more modern building, still with a thatching grass roof, but with corrugated iron accessories.  This was based on a building I saw in Gabon, which now I look at it again had an all corrugated iron roof and the side-planks were vertical not horizontal.  No matter: 'tis but artistic licence.
Therefore, construction as noted was mainly from coffee stirrers braced with matches and cardboard.  The removable roof was made from bristles cut from an old brush stuck on to more cardboard and the veranda was roofed with bits of corrugated cardboard.
After undercoating inside and out in black, I basically dry-brushed the whole thing in various colours to get the effect I wanted.  Dark washes were used around the bottom of walls and in the shadows.  I have numerous tester pots of house paint lying about and to be honest they do just as well for this sort of work as anything.
The other building I did was meant to represent a collection of shanty houses.  This was made from thin polystyrene sheet (pizza packaging) and then covered in corrugated cardboard.
Again, dry-brushing in various colours was the order of the day, with an emphasis on giving things a rusty wash (I use Revell 37 Reddish Brown for that).
And as usual for the bases I textured these from my tub of coarse shelly sand and added various tufts of long grass in the corners.
Our glorious leader arrives in town, taking no chances
Anyway, that's it for now.  I'll have various other cardboard 'n' coffee stirrer construction projects to write about this year and, amazingly, a wargame AAR I've still to recount, so stay tuned.

Thursday, 17 October 2019

Stone Bridges

I'm not obsessed with bridges, no, it's just that I never seem to have enough of them, of the right kinds or periods.  So over the last few years there's been the Arnhem Bridge, an ancient period bridge, a couple of wooden bridges and an ACW period 'barn bridge' variant.

WSS Danes crossing a bridge
This time, for a planned wargame, I decided that I needed a new stone bridge.  So I built two of them, one intended for 15mm and the other for 20mm, because at the time I wasn't sure whether the game would be in 15mm or 20mm.  To do this I made a cardboard template for the sides which was used for both bridges.
Standard template
Construction comprised my usual pizza base polystyrene sheeting to form the sides.  The road surfaces (about 45mm wide for the 15mm bridge and 65mm for the 20mm bridge) were made from cardboard gently curved to shape, with wooden coffee stirrers glued underneath for strength and to provide more surface area for the PVA to key with when attaching the sides.  The buttresses were made from carved balsa or polystyrene.
Pointy
The second bridge used the same template, making both bridges the same length.  I did this because I've only got one width of river I'd made previously and also I didn't want the larger scale bridge to be too long and therefore take up too much space on the table.

The only difference was that I made the 20mm bridge at the larger scale with double the thickness of polystyrene walls.  The idea for this bridge was to make a representation of an eighteenth century bridge, based in fact on Wade's bridge at Aberfeldy in Perthshire.
Wade's Bridge at Aberfeldy
Bridges like this were constructed to link various of General Wade's roads across the Scottish Highlands, intended to enable swift movement of redcoats to subdue the Highlanders and to crush any inconvenient ideas they happened to have about not wanting to continue under Hanoverian/ British rule.
Pointy and painted
Anyway, to make this model more Aberfeldy-like I added some wooden trim to the sides and sharp pylons at each corner of the parapet, made from carved balsa.  I couldn't make the pylons as ridiculously high as the ones on the original bridge because they'd just get knocked off in storage or in action. 
Italeri French crossing a bridge
Once constructed everything was undercoated in black and then painted in a dark grey and dry-brushed with white.  Neither bridge has had an outing yet, but I think it likely that a future scenario from our One Hour Wargames campaign will include at least one substantial bridge, so look out for one or other of them.

Saturday, 5 January 2019

Customs Post

Customs (related to trading, as opposed to Yuletide) seems to be in the news of late, so what better way to celebrate this than to make a customs post?
This is for my AK47 collection and is actually an almost complete copy of a building from IrishSerb's blog, made in connection with his [checks website] on-going Mugabia-Uwanda War [OK, so not Ramsgate].  My approach to construction was similiar to his, i.e. practically the same.
For the customs building itself this was made using poor-man's foam board (pizza base polystyrene), which was pinned and glued together (I use Evo-Stik wood-glue for everything).  The bit of roofing over the 'serving hatch' and shutters made from corrugated cardboard were added, and a door was made at the rear from a piece of cardboard fixed inside the walls with some thin card panels attached to the outside.  Once the glue was dry everything inside and out was undercoated in black.
The walls were then covered in wood-glue and the building was dipped into a tub of fine sand to get most of the walls covered.  The sides of the building were painted using an earthy colour I use for mud-brick buildings. 
The areas of sand were then painted off-white (blue at the bottom), with smooth areas of wall (where there was no sand) left as bare 'mud', as though the plaster had fallen off.  The removable roof was made of corrugated cardboard, painted black and then rust colour.  Basing was my usual approach of coarse shelly sand painted dark earth and then dry brushed.
In addition to the customs post I made a small shelter for the sentries (I'd also started to make a swing barrier from a cocktail stick but then thought better of it).
The shelter was made from wooden coffee stirrers cut up with a pair of pliers, with sheets of fine corrugated cardboard laid over the top to form the roof.  Everything was undercoated in black and the wooden walls were then heavily dry-brushed with dark earth and the roof treated with a rust colour.
Further washed-out colours were added to the roof panels before the whole thing was lightly dry-brushed in a sand colour.  Basing for both models was completed with Javis static grass and some stick-on clumps of long grass.